Winter Filth

Ah, Winterfylleth. The ancient Anglo-Saxon month that marked the beginning of winter - as recorded by the Venerable Bede.
Roughly corresponding to October in the modern Gregorian calendar. Starting this year on the New Moon of the 3rd of October and wrapping around the first full moon of winter on the 17th.
Not to be confused with Tolkien's Winterfilth - the tenth month of Shire-calendar. Running from 22nd September to 21st October if you are a hobbit.
Best appreciated with strong liquor.
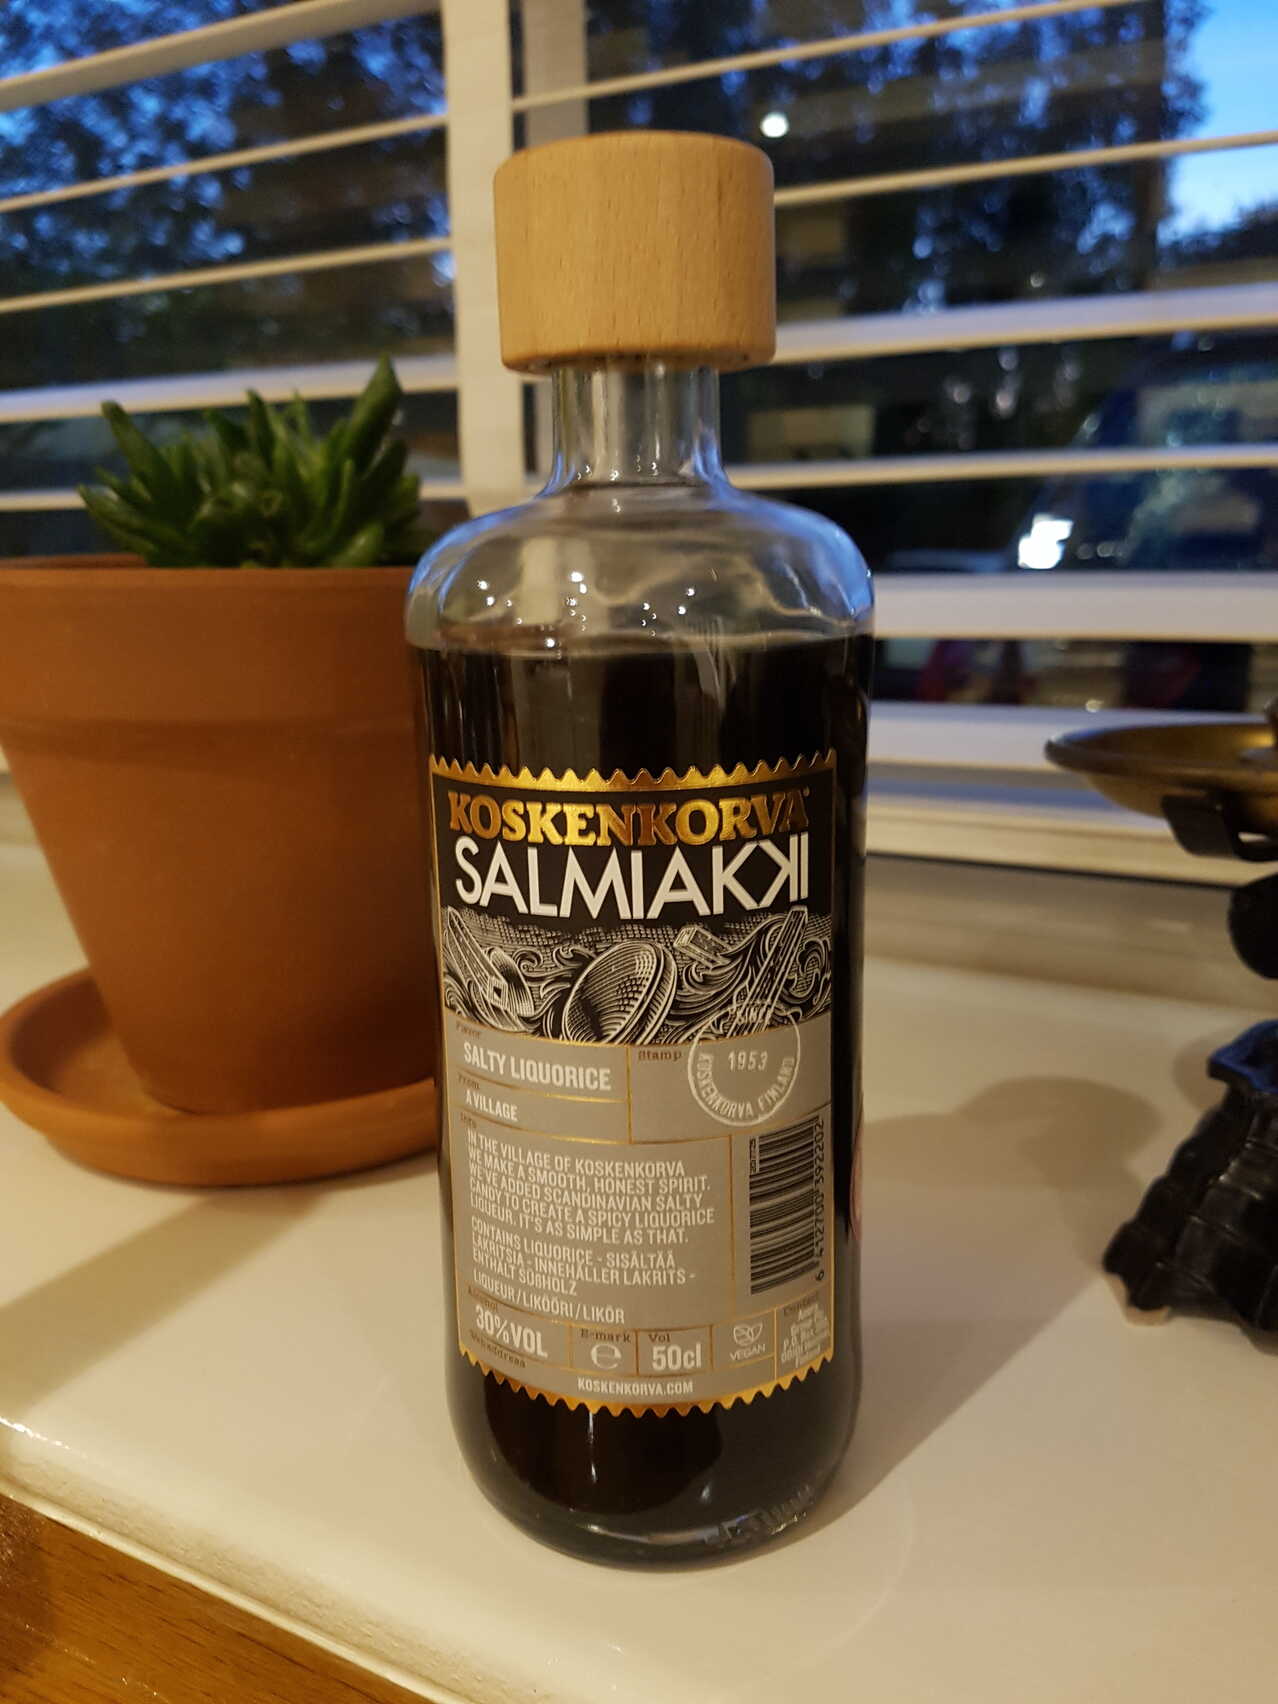
Speaking of which, ever since I went to Finland to sample Fazer's chocky eggs (and visit Moomin World) I've been a great fan of the Finnish salty liquorice flavour sal ammoniac (ammonium chloride), which they call salmiakki.
Fazer hide surprise bursts of it in many of their sweeties.
So I was delighted to discover, the other day, that you can get a salty liquorice flavoured vodka called Salmiakki on Amazon.
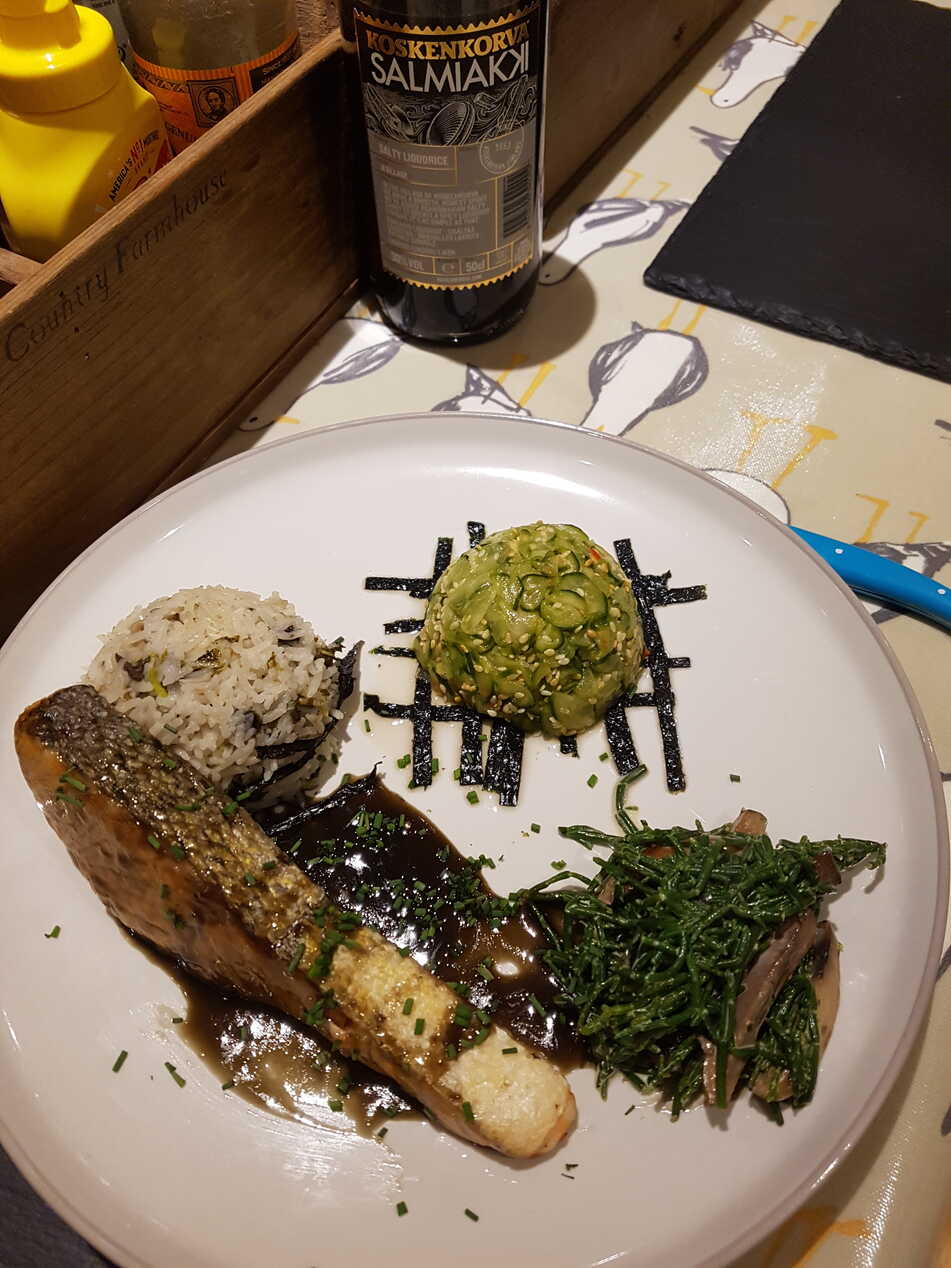
From there, it's just a short step to combining a Japanese salmon preparation technique with a strongly flavoured Finnish vodka to create an obvious pun-based dish.
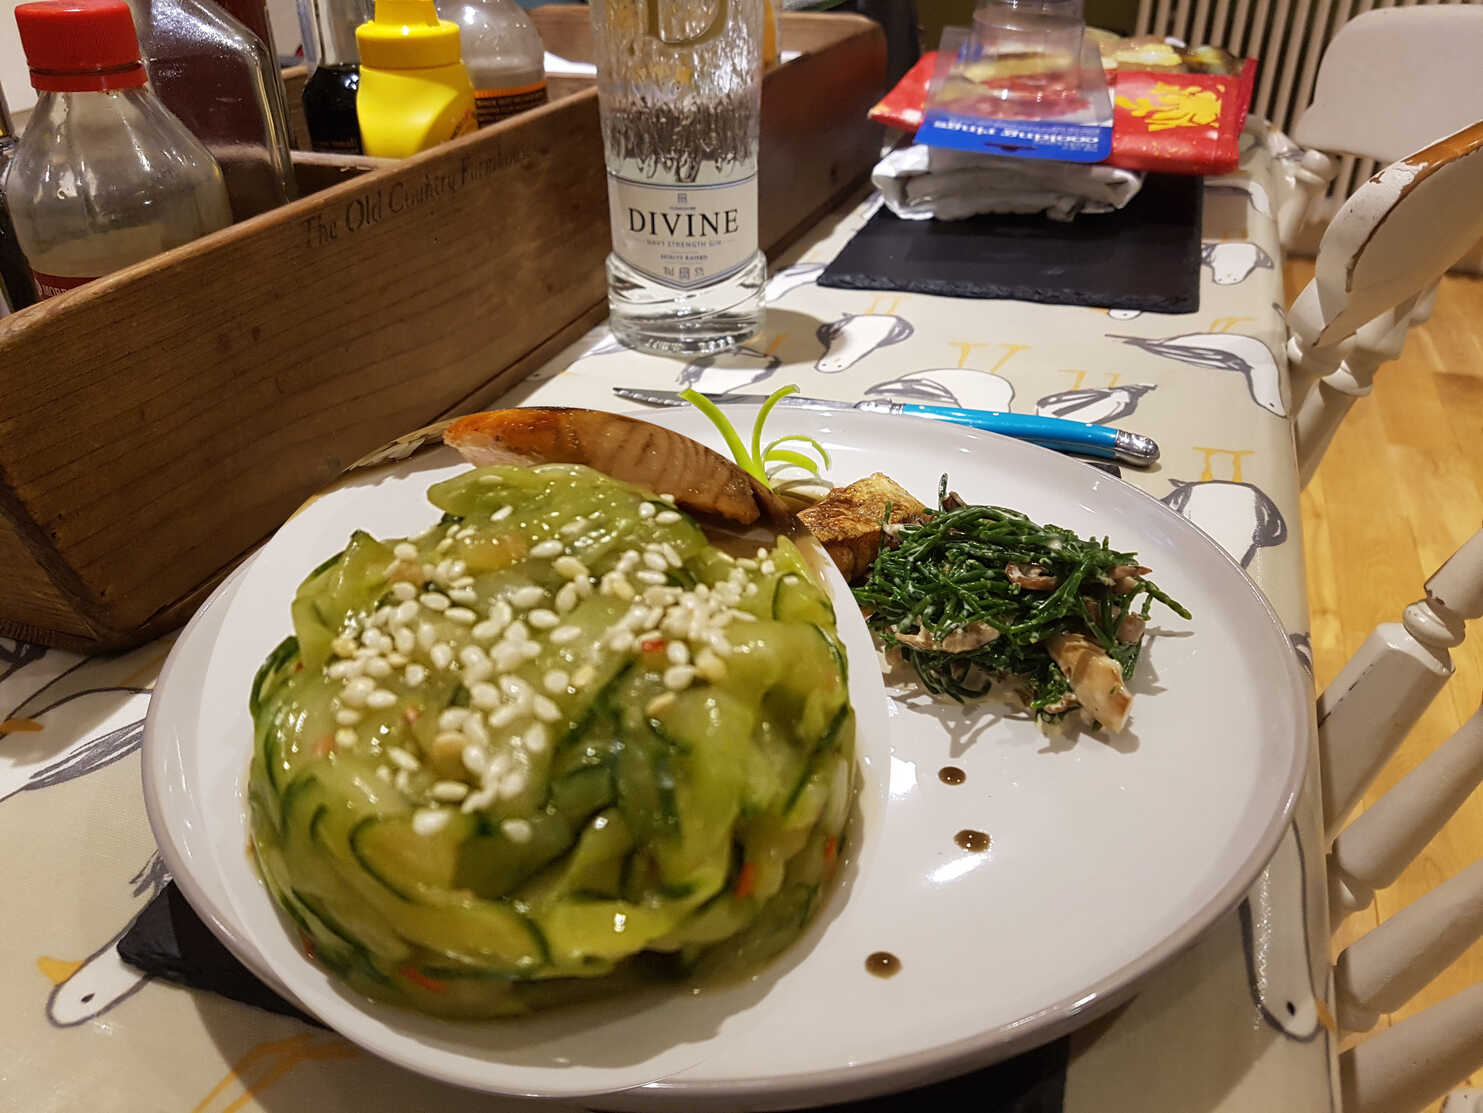
And thus was SALMONIAKꞰI born.
Salmoniakki
main fish
I couldn't resist this Finnish salmiakki-flavoured vodka. I thought it might make a great flavour for salmon en papillote.
Or possibly teriyaki-style, bubbled into a sauce with maple syrup perhaps? Maybe some vinegar.
Fry the salmon coated in potato starch, or tapioca starch.
The problem I had was that the sauce wasn't thickening the way a teriyaki does - probably the lack of soy sauce, which I don't want to add. Nor do I want any more maple syrup since the sauce is sweet enough. So I thought I'd try adding a thick beer - Barley Wine yes, I realise the name is confusing. I know that the Finns do drink a barley-based beer called sahti so it doesn't seem inappropriate, and in fact the flavour does blend well, mellowing the more aggressive sal ammonia notes, but it doesn't actually thicken things terribly much.
So after much experimentation I gave in and whisked in a few pinches of xanthan gum. Add cautiously - and whisk furiously lest it clump.
So now, what to serve it with?
I started with Flora's Samphire and Creamed Chanterelles (because Finns like their mushrooms), a Japanese Cucumber Salad (because Finns like vinegar), and some rice with spring onion slices (because teriyaki!).
I'm not sure about the mushrooms (maybe add some pickled anchovies?), but the cucumber salad worked very well.
I'm wondering about potato, or a potato purée (since the Finns like potatoes and after all, they don't eat rice), and perhaps a beetroot and horseradish puree (because they also seem like the kind of things Finns eat)?
Beetroot and horseradish agar-agar caviar seems like it might be nice.
I might even make a meal out of it.
Serves 2
Ingredients
- 2x2" slices of salmon fillet
- potato or tapioca starch
For the Sauce:- 3 tblsps Salmiakki flavoured vodka
- 2 tblsps barley wine
- 1 tblsps maple syrup
- pinches of xanthan gum
The Method
So. After some experimentation, here is what you do:
Clean de-bone and descale the salmon. Cut and trim neat pieces.
Stir to dissolve the maple syrup, then simmer until reduced by ½ or ⅔.
Whisk in a couple of pinches of xanthan gum to thicken it if you want - it probably won't coat the fish well without it.
Sift potato or tapioca starch over the fish fillets.
Heat a little oil in a frying pan and fry the fillets skin-side down over medium heat until the fillets colour about a third of the way up.
Flip the fillets and again colour them about a third of the way up.
Transfer the salmon to a plate and clean the pan with kitchen towels. Pour some of the salmoniakki sauce into the frying pan, return the salmon pieces, and flip them in the sauce to coat and glaze.
Clean de-bone and descale the salmon. Cut and trim neat pieces.
If you have the time season the fillets and leave them uncovered overnight in the fridge.
Mix all the sauce ingredients in a small pot, and bring to the boil.Stir to dissolve the maple syrup, then simmer until reduced by ½ or ⅔.
Whisk in a couple of pinches of xanthan gum to thicken it if you want - it probably won't coat the fish well without it.
Sift potato or tapioca starch over the fish fillets.
Heat a little oil in a frying pan and fry the fillets skin-side down over medium heat until the fillets colour about a third of the way up.
Flip the fillets and again colour them about a third of the way up.
Transfer the salmon to a plate and clean the pan with kitchen towels. Pour some of the salmoniakki sauce into the frying pan, return the salmon pieces, and flip them in the sauce to coat and glaze.
You avoid overcooking the salmon on the first fry-through since it will cook some more at this stage in the sauce.
Serve the glazed salmon with extra sauce drizzled over it.
It even surprised me how delicious this is!
I wonder how well this would work en papillote?
If it were teriyaki you'd serve it over rice, but I doubt the Finns eat much savoury rice. Potato probably. Maybe some Karjalanpiirakka pastry?
I wonder how well this would work en papillote?
If it were teriyaki you'd serve it over rice, but I doubt the Finns eat much savoury rice. Potato probably. Maybe some Karjalanpiirakka pastry?
Flora's Samphire and Creamed Chanterelles
veg side
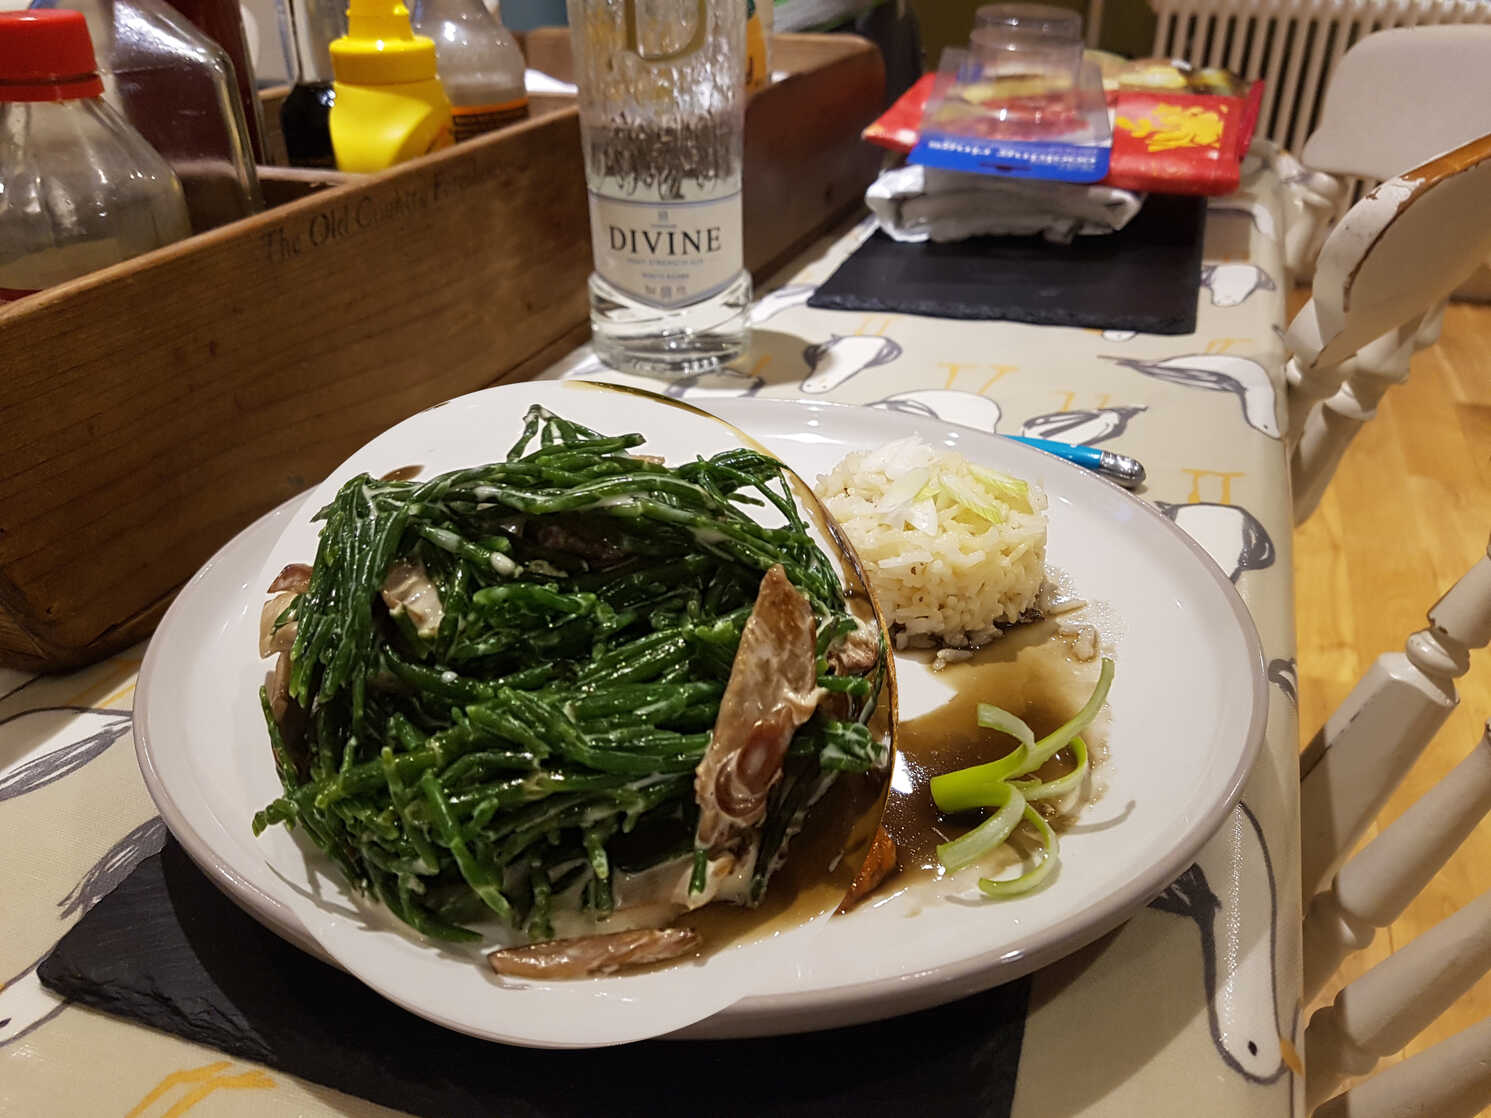
Flora boasted about her successful combining of samphire, creamed chanterelles and scallops.
I didn't have any chanterelles, so I first made this using thinly sliced oyster mushrooms, which are frankly less than ideal.
Then I tried matchsticks of regular mushrooms, which were an improvement, but I think cordyceps would be even better - they even resemble samphire in shape and size.
I also made the mistake of flavouring the cream with cognac instead of calvados, which would have been a definite improvement.
Neither did I have any scallops, but I think you can safely skip those.
I also made the mistake of flavouring the cream with cognac instead of calvados, which would have been a definite improvement.
Neither did I have any scallops, but I think you can safely skip those.
Serves 2
Ingredients
- two handfuls of samphire
- handful of chanterelles though I used oyster mushrooms
- small knob of butter
- splash of olive oil
- 1 tblsp calvados Not cognac!
- 2-3 tblsps double cream
Throw the samphire into boiling water, return to the boil then drain the samphire and dump into iced water to refresh.
Fry the chanterelles until lightly browned you can slice them into shreds to more match the samphire stalks if you like in a little butter and olive oil.
Deglaze the pan with calvados, bubble it off, then add double cream to coat the mushrooms and stir until the sauce thickens.
When ready to serve, bring another pot of water to the boil, drop the samphire in and bring to the boil again. Drain, mix with the creamed mushroom, and serve.
I'm still not entirely convinced by the combination, but the result is at least edible, and reasonably interesting.
I tried finishing with a splash of cider vinegar, but that doesn't really work.
I also tried adding some shredded nori seaweed sheets. That wasn't too bad.
I tried finishing with a splash of cider vinegar, but that doesn't really work.
I also tried adding some shredded nori seaweed sheets. That wasn't too bad.
Japanese Cucumber Salad
Sunomono
Sunomono
salad veg vegan
Salting the cucumber slices leaves them surprisingly crisp in this simple Japanese salad.
I skipped the wakame seaweed, since I didn't have any,
though I did a couple of rounds using sliced nori seaweed
and used the Thai pineapple and fish sauce dressing from my
Lemongrass and Pineapple Beef Vermicelli Stir-Fry as the pickling liquid and it was still good!
The salting process is so effective that you could easily munch your way through an entire dessicated cucumber.
The salting process is so effective that you could easily munch your way through an entire dessicated cucumber.
Serves 4
Ingredients
- 2 Japanese cucumbers (or 3 Persian cucumbers - about 300g)
- 1-2 tsp fine salt
- 1 tblsp dried wakame seaweed (3g dried, 20-30g rehydrated)
- ½ tblsps toasted white sesame seeds
For the Dressing:- 4 tblsps unseasoned rice vinegar
- 2 tblsps sugar
- ½ tsp salt
- ½ tsp soy sauce
- 1 red chilli, minced
In a saucepan combine the rice vinegar, sugar, soy sauce and salt.
Soak the dried wakame seaweed in water and let it rehydrate for 5 minutes.
Meanwhile, peel the skin of 2 Japanese cucumbers, leaving some skin on to create stripes. Then, slice them very thinly into rounds, best done using a mandoline.
Sprinkle fine sea salt on the slices as you go, then gently massage it all in. Set aside for 5-15 minutes.
The salt helps draw out the moisture from the cucumbers (so it does not dilute the salad dressing after mixing).
Squeeze out the liquid from the rehydrated wakame seaweed and add it to a medium bowl.
I'd skip the salt.
Thoroughly squeezing out the cucumber will get rid of excess salt but there'll still be some left in there, so I would only add more salt as necessary after you taste the final product.
Heat over medium heat and whisk it well together. When the sugar is dissolved completely, remove the saucepan from the heat and let it cool.
If the vinegar flavour seems too strong then dilute it with a small amount of dashi or water.
Thoroughly squeezing out the cucumber will get rid of excess salt but there'll still be some left in there, so I would only add more salt as necessary after you taste the final product.
Adding some minced de-seeded red chilli is quite nice.
Soak the dried wakame seaweed in water and let it rehydrate for 5 minutes.
Meanwhile, peel the skin of 2 Japanese cucumbers, leaving some skin on to create stripes. Then, slice them very thinly into rounds, best done using a mandoline.
Sprinkle fine sea salt on the slices as you go, then gently massage it all in. Set aside for 5-15 minutes.
The salt helps draw out the moisture from the cucumbers (so it does not dilute the salad dressing after mixing).
Squeeze out the liquid from the rehydrated wakame seaweed and add it to a medium bowl.
The seaweed adds an interesting variation in texture and mild briny flavour, but don't overdo it.
It's quite sticky messy stuff that gets everywhere as you squeeze it out. Also the dried packet I had contained quite a lot of large, thick or fibrous pieces amongst the finer, smaller usable ones. So you may have to go through the re-hydrated assortment quite carefully to pick those out.
Squeeze out the liquid from the cucumbers.
No need to be gentle - they can take it!
Add them to the bowl, mix them with the dressing and toss it all together.
Lightly toast the sesame seeds in a dry frying pan and add them to the cucumber, mixing everything together.
It's quite sticky messy stuff that gets everywhere as you squeeze it out. Also the dried packet I had contained quite a lot of large, thick or fibrous pieces amongst the finer, smaller usable ones. So you may have to go through the re-hydrated assortment quite carefully to pick those out.
Very good. I'm not sure how long it will stay crisp though so best eat it soon.
Fortunately you don't get terribly much end product from one cucumber - all the salting and squeezing will reduce it practically to nothing!
There is just one thing, however- with the amount of dressing here, the made-up mixture is pretty wet. So if you're trying to pile it neatly on the plate you may need to dry it off, contain it somehow, or use less dressing. Perhaps half.
There is just one thing, however- with the amount of dressing here, the made-up mixture is pretty wet. So if you're trying to pile it neatly on the plate you may need to dry it off, contain it somehow, or use less dressing. Perhaps half.
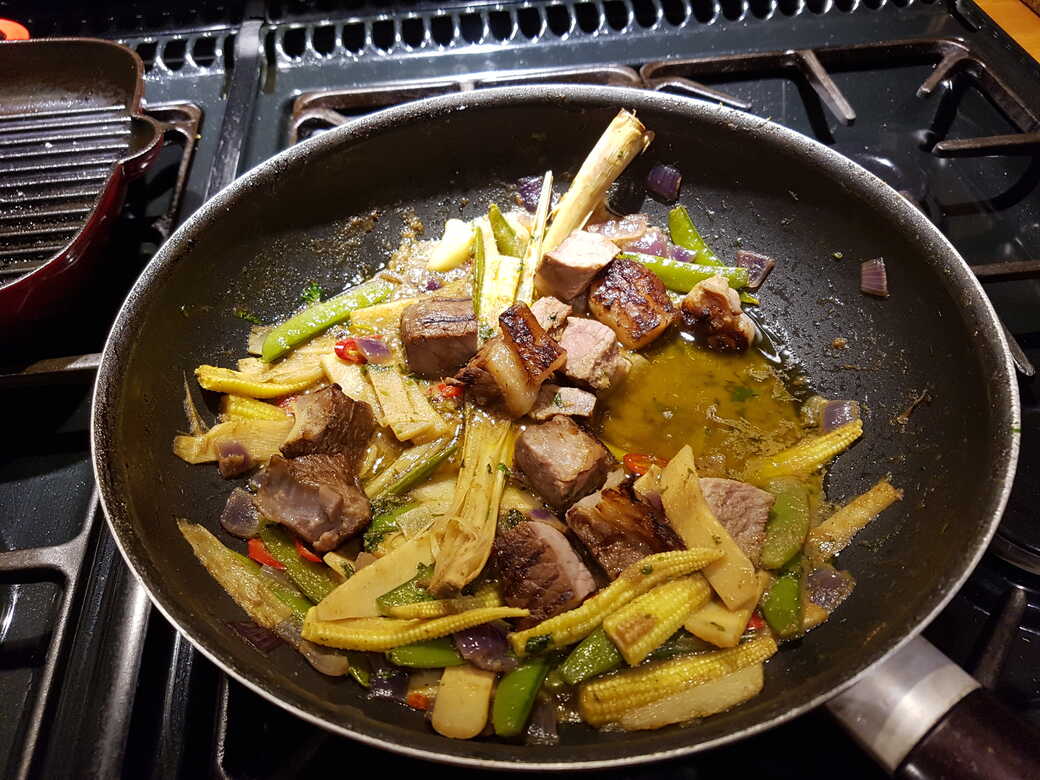
Thai Green Curry Squash
main curry thai veg vegan
I made the mistake of buying some attractive French gourds to decorate the kitchen for a few days, before cooking with them - a twofer!
Unfortunately, it turns out that decorative squash, whilst definitely edible, have incredibly thick skin and surprisingly little flesh.
Should have gone with the butternut squash! As recommended in the recipe I (mostly) followed.
I fancied trying their soy-sauce-frying technique for cooking the squash, and it was mostly successful (though it does make the squash very salty).
I did make the mistake of adding peanut butter to the green curry paste in an attempt to turn it more padan-y. But to be honest that didn't really work well.
It might have been better to base the paste around red curry paste, rather than the green. The flavours mostly clashed, rather than working together.
Serves 4
Ingredients
- 2 tblsp sunflower oil
- 1 medium (about 800g) butternut squash, peeled and cut into bite-sized cubes
- 3 tblsp light soy sauce
- 1 lime, wedged to serve
- a handful coriander, roughly torn, to serve
- 1 red chilli, deseeded and finely sliced, to serve
- 1 spring onion, finely chopped to serve
- jasmine rice, to serve
Green Curry Base:- 1 stalk lemongrass, bruised
- 2 tblsp Thai green curry paste red might be better here
- 2 tblsps peanut butter or perhaps not!
- 2 x 400ml tins coconut milk
- a handful sugar snap peas, halved
- a handful asparagus spears, tough ends removed
- a handful green beans, trimmed
- 2 tbsp frozen or fresh edamame beans
Heat 1 tbsp of sunflower oil in a wok while you toss the butternut squash cubes into the soy sauce.
Put the soy-coated butternut squash in the wok and cook over a medium heat for 10 minutes or until softened and browned, stirring frequently.
Add the lemongrass and Thai green curry paste and peanut butter - although you might want to reconsider that!, and fry over a high heat for 1 minute.
Stir in the coconut milk, then reduce the heat slightly and simmer for 8 minutes.
Throw the sugar snap peas, asparagus, green beans and edamame beans into the curry sauce or green beans - if that's all you have to hand and cook for 4-5 minutes or until the vegetables are cooked but still have some bite.
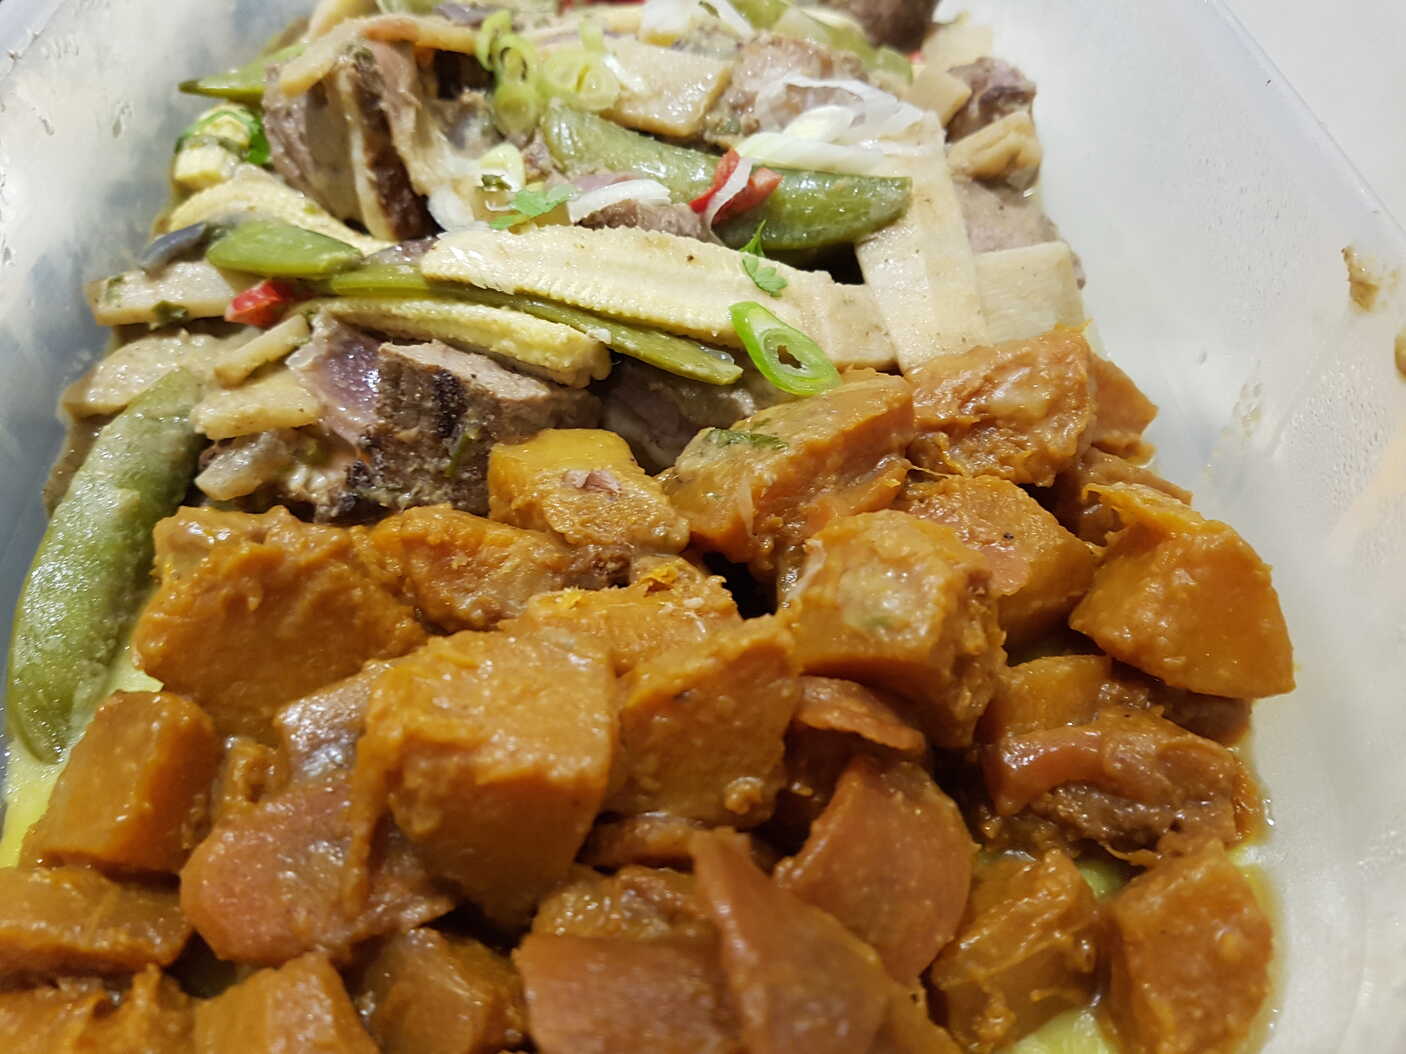
Ladle the curry into bowls and spoon in the softened soy-glazed butternut squash.
Top each bowl with a squeeze of lime juice, sprinkle with the coriander, add a few slices of chilli and a scattering of spring onion.
Serve with bowls of jasmine rice.
Put the soy-coated butternut squash in the wok and cook over a medium heat for 10 minutes or until softened and browned, stirring frequently.
After browning the squash for a few minutes I covered my wok with a lid to help cook it through.
For the green curry base, heat the remaining sunflower oil in a separate large frying pan.Add the lemongrass and Thai green curry paste and peanut butter - although you might want to reconsider that!, and fry over a high heat for 1 minute.
Stir in the coconut milk, then reduce the heat slightly and simmer for 8 minutes.
The original recipe calls for low-fat coconut milk.
WTF even is that?
Remove and discard the lemongrass stalk.WTF even is that?
Throw the sugar snap peas, asparagus, green beans and edamame beans into the curry sauce or green beans - if that's all you have to hand and cook for 4-5 minutes or until the vegetables are cooked but still have some bite.
Ladle the curry into bowls and spoon in the softened soy-glazed butternut squash.
Top each bowl with a squeeze of lime juice, sprinkle with the coriander, add a few slices of chilli and a scattering of spring onion.
Serve with bowls of jasmine rice.
I can see that you probably do need to keep the soy-fried squash separate until serving, or it will lose its identity in the sauce.
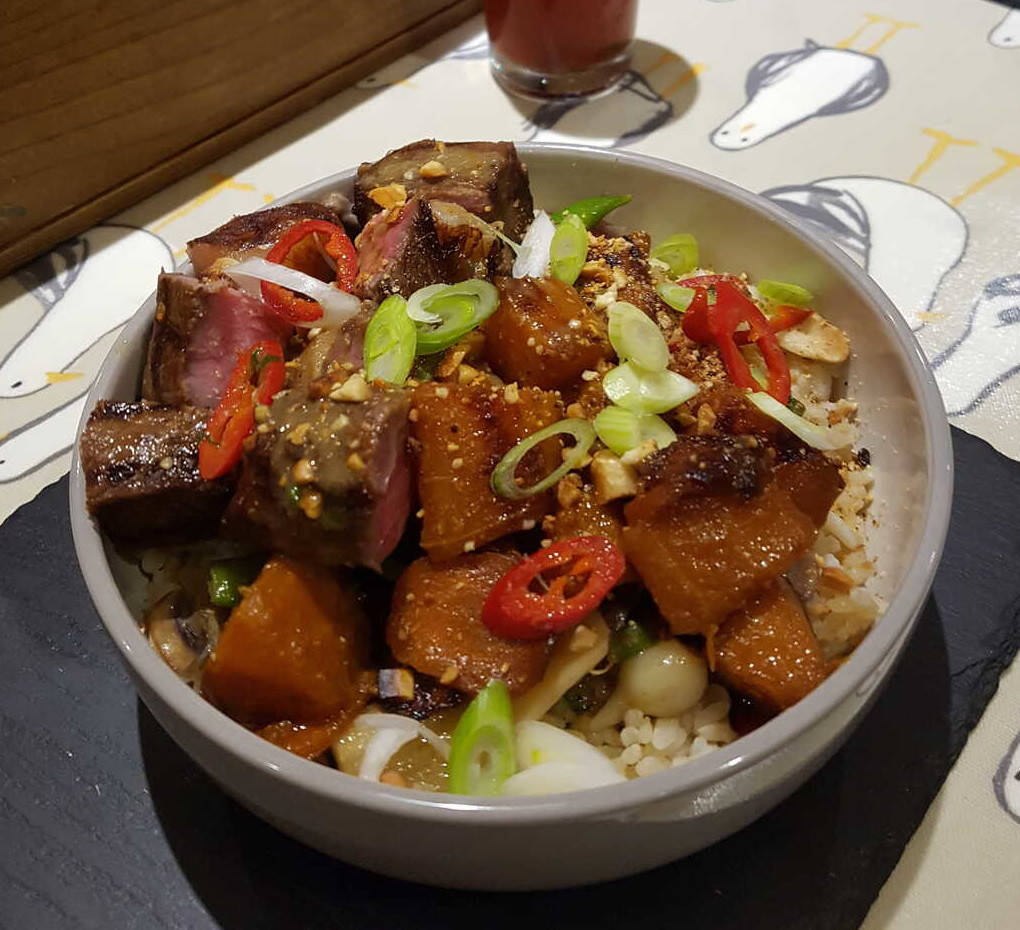
Soy-Glazed Sirloin
main meat
Lacking a sous-vide device myself Hello Santa? I improvised one -
I discovered that if I filled my slow cooker with water at 51°c and set it on low it would hold the temperature pretty well without the lid on.
So that's what I used instead. I call it my slow-vide 🤣
The lack of a water circulator didn't seem to matter much since the entire sleeve of the machine heats the water fairly uniformly.
So that's what I used instead. I call it my slow-vide 🤣
The lack of a water circulator didn't seem to matter much since the entire sleeve of the machine heats the water fairly uniformly.
Serves 4
Ingredients
- 12oz/350g piece of sirloin
- 2 tblsps soy sauce
- 2 tsps toasted sesame oil
- 2 tsps rice vinegar
- 2 tsps fish sauce
- 2 tsps mirin
- Wot, no garlic??
Pour the marinades into a freezer bag with the steak.
Lower the open bag carefully into a large bowl of water and use the pressure of the water to squeeze all the air out before sealing the top shut.
Looking at you slow-vide!
When ready to eat, lift the bag out of the sous-vide and the steak out of the bag.
Heat a cast-iron skillet until scorching hot, then quickly sear the outside of the steak. It is now ready to slice and serve.
Or use a vacuum-sealer!
Put the bag into a sous-vide device, weighing its contents down with a plate or something, and cook for 2-3 hours at 53.9°C, or between 50°c and 55°C depending on your device's capabilities.Looking at you slow-vide!
When ready to eat, lift the bag out of the sous-vide and the steak out of the bag.
You have to make sure you don't submerge the top of the bag in the sous-vide water, unless your certain of the seal.
I used a clothes peg and some string to hold the top out.
You will now have quite a lot of marinade and steak fat left in the bag with which to to think of things to do. Like glazing some butternut squash?
Dry the steak thoroughly with kitchen paper. Lubricate it lightly with a neutral high smoke point oil. Just smear it on with your hands!You will now have quite a lot of marinade and steak fat left in the bag with which to to think of things to do. Like glazing some butternut squash?
Heat a cast-iron skillet until scorching hot, then quickly sear the outside of the steak. It is now ready to slice and serve.
It's good steak too!
You can leave it as long as you need in the bath once cooked, and then the sear-to-serve only takes a couple of minutes.
You can leave it as long as you need in the bath once cooked, and then the sear-to-serve only takes a couple of minutes.
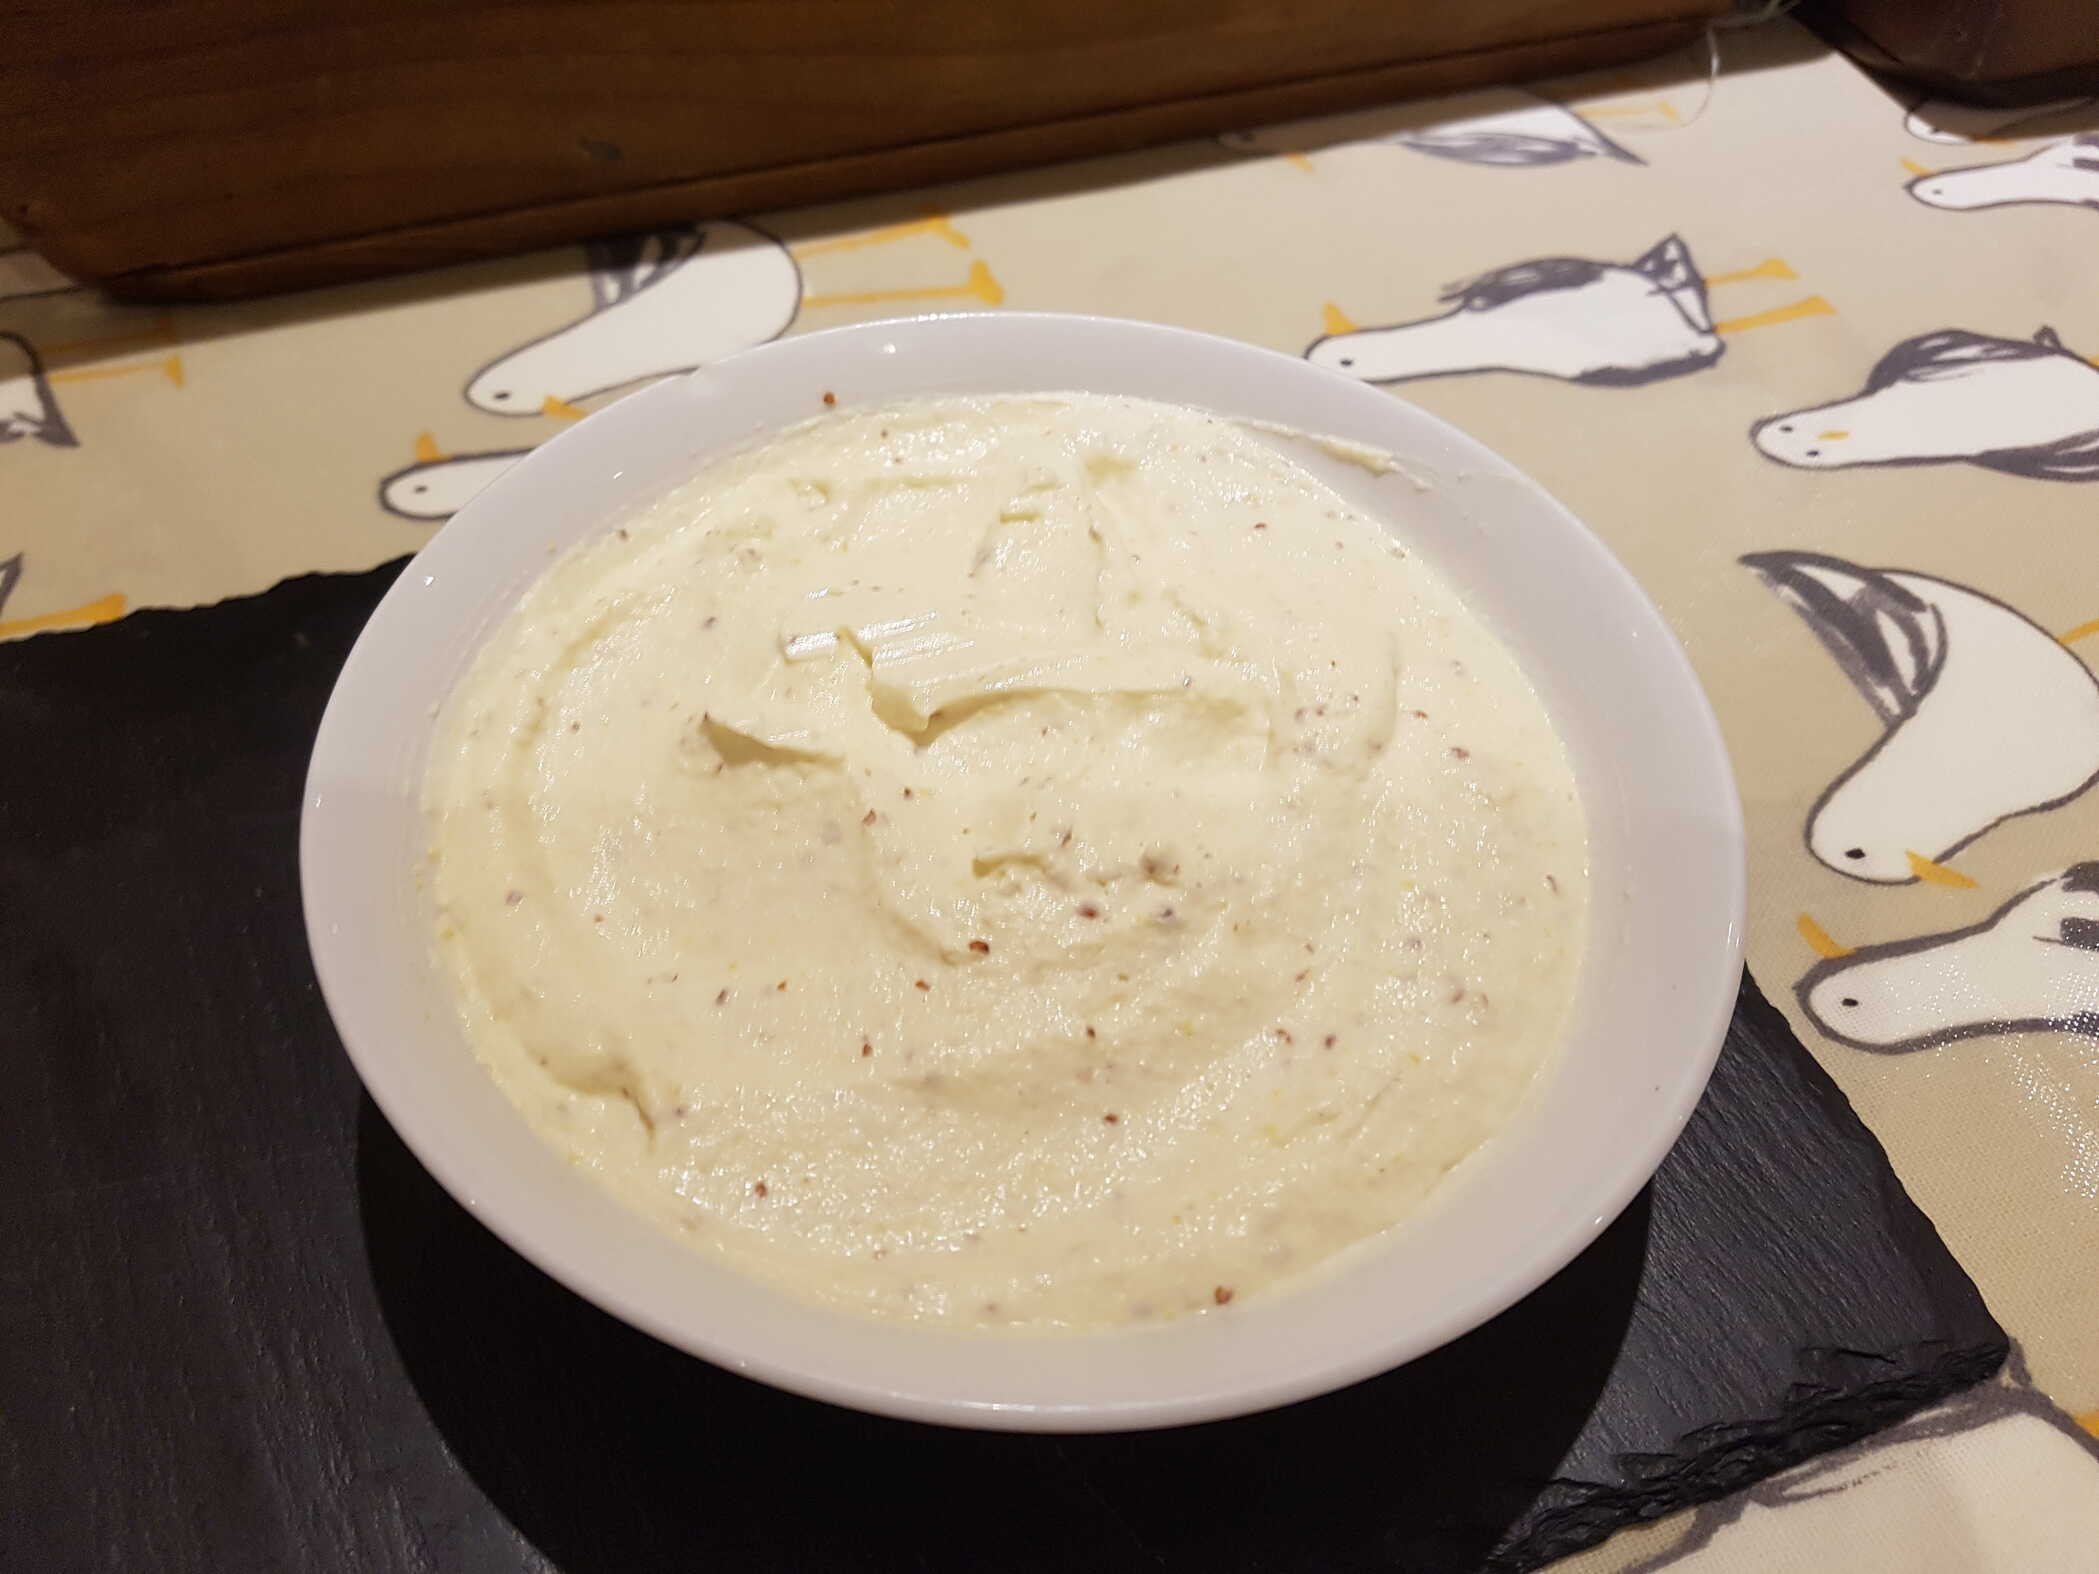
Celeriac Purée with Mustard and Goat's Cheese
veg side
Another celeriac purée, but this one offsets some of the bitterness introduced by the mustard (especially if you accidentally use Dijon) with some honeyed goat's cheese that I happened to have lying around.
Adding some potato would help make the purée smoother too.
Adding some potato would help make the purée smoother too.
Ingredients
- celeriac
- cream
- whole grain mustard
- salt
- butter
- goat's cheese honeyed is good
Chop the celeriac into fat chunks and simmer them for about 15 minutes until they soften.
Season and blend in some pieces of butter to enrich the mixture.
You could gently sweat the celeriac in butter and cream or milk for a really long time to soften it instead.
Warm the softened pieces with cream and goat's cheese, then blend with whole grain mustard.Season and blend in some pieces of butter to enrich the mixture.
Good combination.
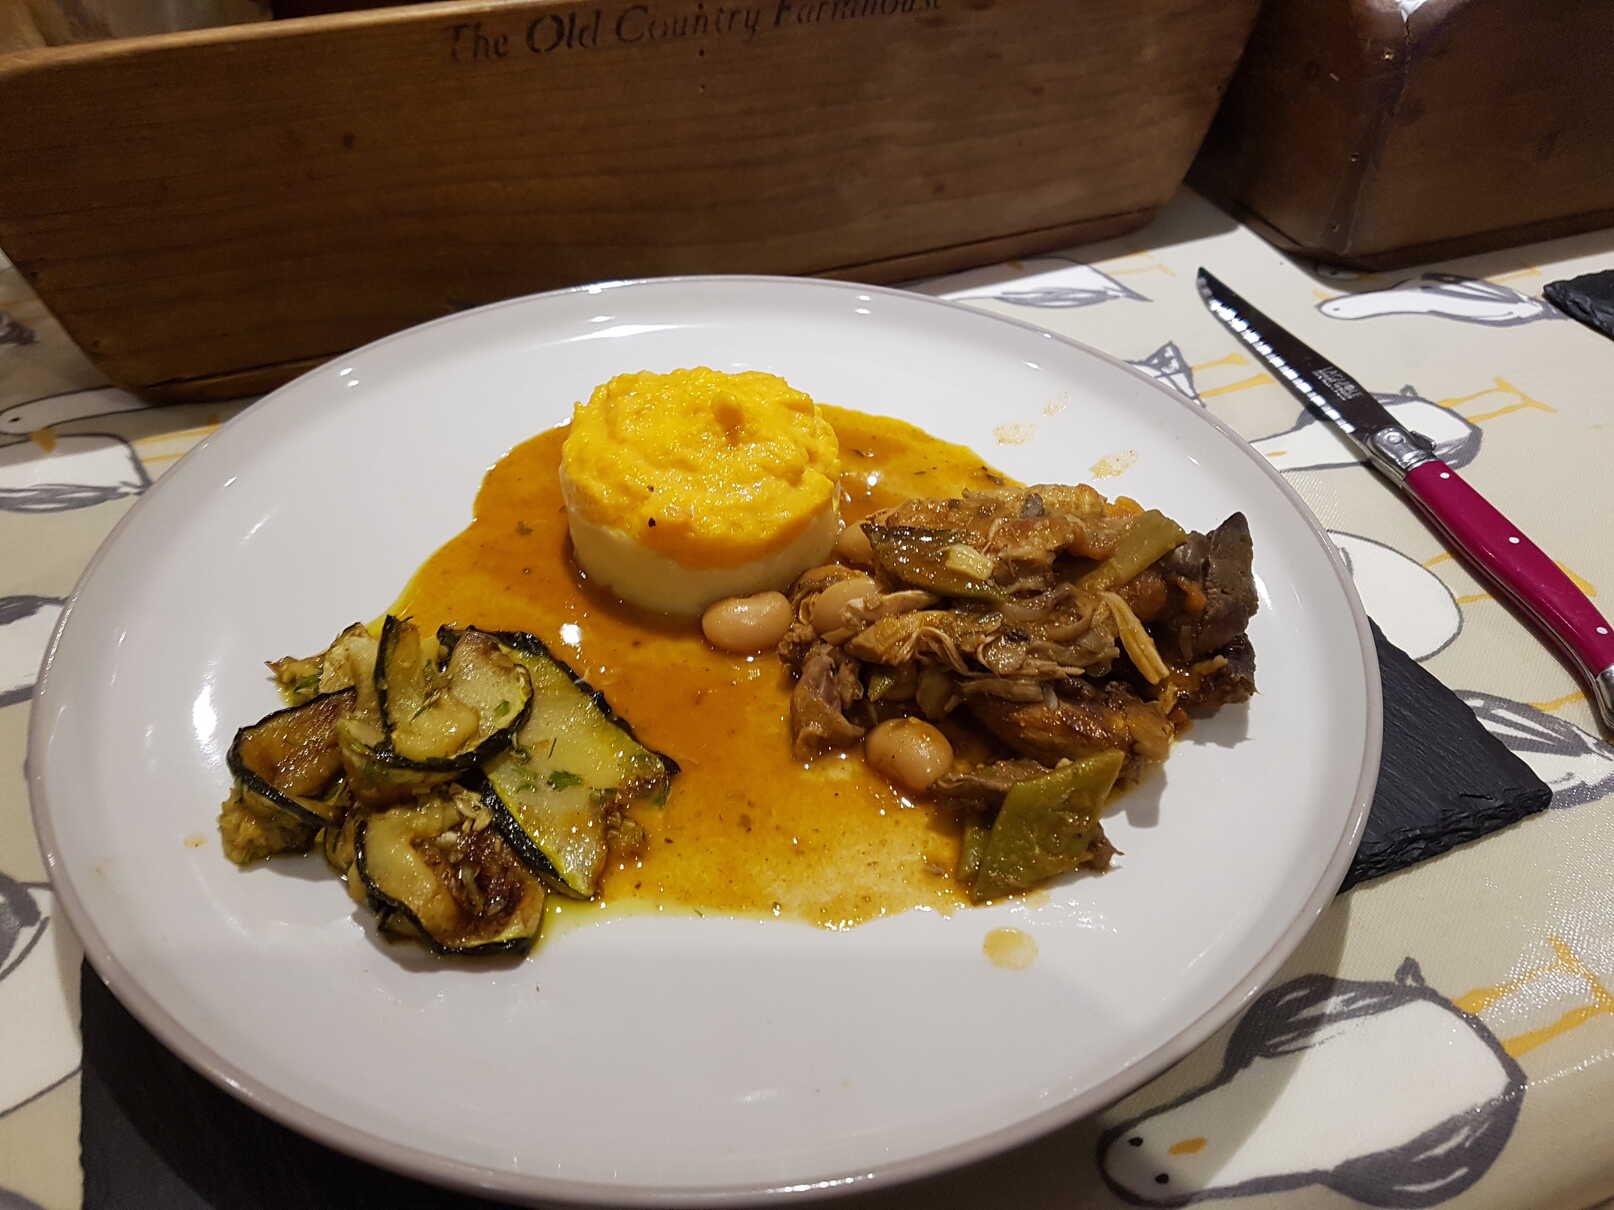
Valencian Paella
main meat fowl
Well, it may be rather late in the year, but my butcher had a rabbit. So paella it would be...
Despite intense scholarly study of the permissible ingredients in a (definitely non-seafood) Paella Valenciana, there remains significant authentic local variation.
So don't sue me for adding some asparagus! According to these researchers the only ten ingredients generally agreed upon are:
Snails used to be quite a common ingredient, and you will also find little meatballs being added.
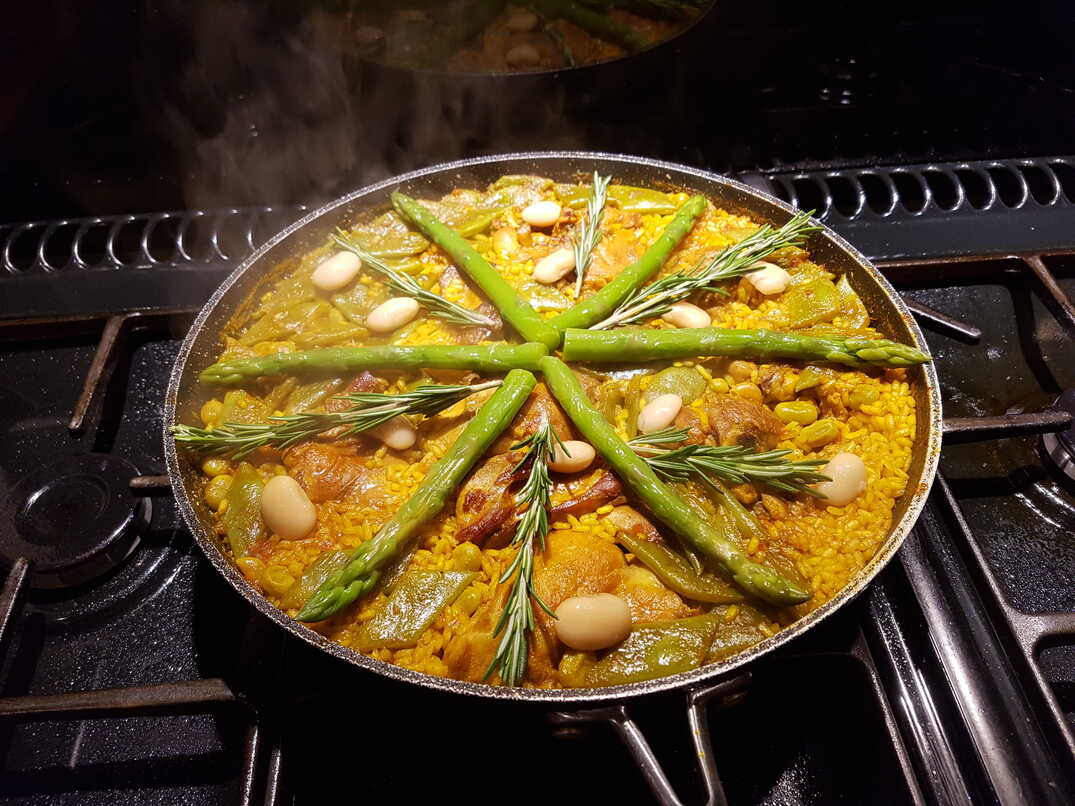
If you like you can blanch the sliced green beans or asparagus! and lay them on top for decoration rather than stirring them through. In which case best to cut them in strips.
I've also seen professional chefs from a mountainous area fry up some strips of long sweet red peppers with the meat, then lay those in a star pattern on top to finish.
Apparently they are known as mountain shrimp, due to the shortage of actual shrimp there.
The official 30cm (rim-to-rim) paella pan, which happens to be the size of my frying pan, is meant to hold 2-3 main course servings.
Generally a paella serving is considered to be 100-125g of rice, and the accepted water:rice ratio for paella rice is 3:1 or possibly 2.5:1.
I may have made my paella a little too thick - it's reckoned it should be only about the thickness of a finger un ditet, or no deeper than 2cm (¾").
The reason being that if the rice is too deep it will not dry out evenly resulting in overcooked rice at the bottom.
And that's going to be my excuse for failing to produce a decent succotash, sorry, I mean socarrat. Except for at the very centre of my pan.
I figured that might preclude cooking with the much thicker pieces of flesh which I had, but looking at photos of authentic paellas I see that they too have hefty lumps of meat sticking up from the bed of rice, so perhaps it would be sufficient to just make sure the tops were cleared of rice while cooking.
The D.O.P certified Valencian rice varieties available for paella making are Bomba, J Sendra or Senia and Albufera.
Though for the non-purist, Calasparra, Marisma or Maratelli might also be acceptable.
Despite intense scholarly study of the permissible ingredients in a (definitely non-seafood) Paella Valenciana, there remains significant authentic local variation.
So don't sue me for adding some asparagus! According to these researchers the only ten ingredients generally agreed upon are:
- rice
- water
- olive oil
- salt
- saffron (or food colouring)
- tomato
- flat green beans
- Garrafó beans, a Spanish variety of Lima beans, also widely known as butter beans
- chicken
- rabbit
Snails used to be quite a common ingredient, and you will also find little meatballs being added.
If you like you can blanch the sliced green beans or asparagus! and lay them on top for decoration rather than stirring them through. In which case best to cut them in strips.
I've also seen professional chefs from a mountainous area fry up some strips of long sweet red peppers with the meat, then lay those in a star pattern on top to finish.
Apparently they are known as mountain shrimp, due to the shortage of actual shrimp there.
The official 30cm (rim-to-rim) paella pan, which happens to be the size of my frying pan, is meant to hold 2-3 main course servings.
Generally a paella serving is considered to be 100-125g of rice, and the accepted water:rice ratio for paella rice is 3:1 or possibly 2.5:1.
I may have made my paella a little too thick - it's reckoned it should be only about the thickness of a finger un ditet, or no deeper than 2cm (¾").
The reason being that if the rice is too deep it will not dry out evenly resulting in overcooked rice at the bottom.
And that's going to be my excuse for failing to produce a decent succotash, sorry, I mean socarrat. Except for at the very centre of my pan.
I figured that might preclude cooking with the much thicker pieces of flesh which I had, but looking at photos of authentic paellas I see that they too have hefty lumps of meat sticking up from the bed of rice, so perhaps it would be sufficient to just make sure the tops were cleared of rice while cooking.
The D.O.P certified Valencian rice varieties available for paella making are Bomba, J Sendra or Senia and Albufera.
Though for the non-purist, Calasparra, Marisma or Maratelli might also be acceptable.
Feeds a Fiesta
Ingredients
- extra virgin olive oil
- paella rice
- salt
- rabbit optional
- chicken
- Ferradura or Bajoqueta large flat green beans
- Garrofón or lima or butter beans
- tomato, grated
- sweet smoked paprika
- saffron
- chicken stock
- rosemary
Optional Extras:- garlic, minced
- artichoke hearts optional
- snails of the Xonetes species
Unacceptable Extras:- asparagus
Cut the artichoke stems short above any wooden section, then peel their rough skin if using.
Cut away the tough outer leaves, then quarter them vertically and remove the hairy choke with a paring knife.
Keep them in water acidulated with lemon juice until needed.
Remove the tough end of the asparagus stalks if using and boil them for a minute, before plunging them into iced water to cool.
Grind the saffron lightly in a pestle and mortar. You can toast it first in a foil wrap in the hot pan for 2-3 minutes if you like, to help release the flavour.
Heat the pan of stock and keep it simmering.
Slice the flat green beans on a bias either lengthways or across, as you like.
Mince the garlic if using.
Grate the tomato on the coarser side of a box grater or similar you can blend them if you prefer.
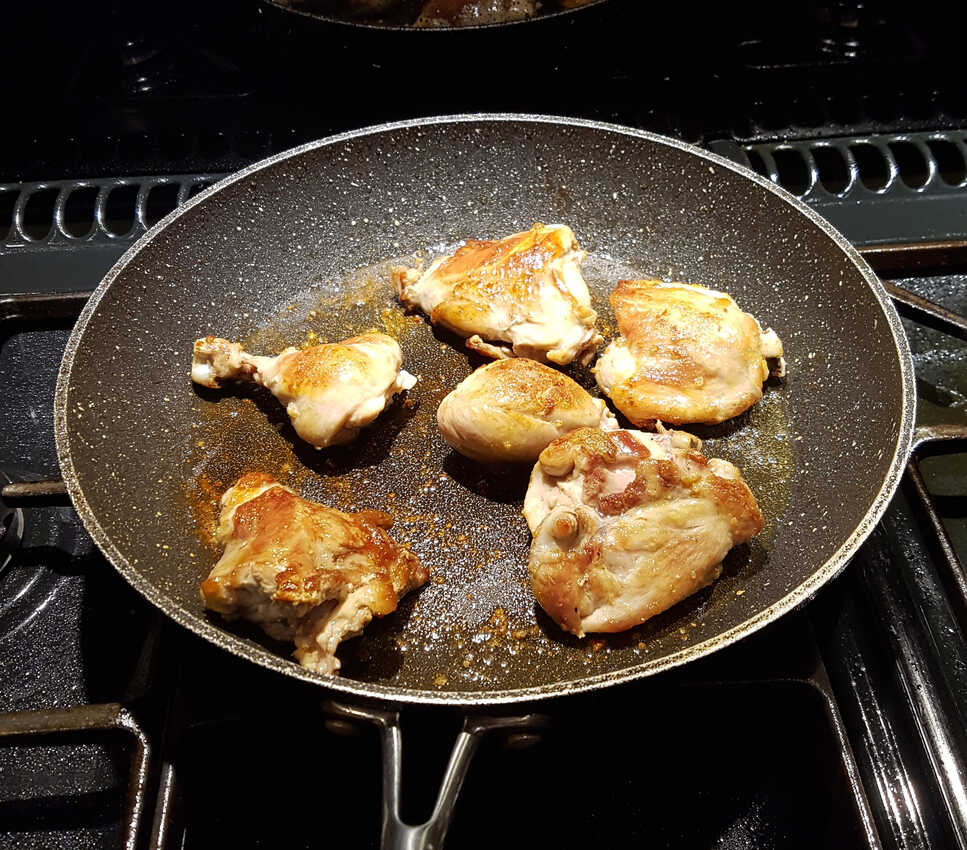
Joint the rabbit and the chicken. Separate the leg sections and the chicken wings discarding the tips of both.
Pour a small puddle of olive oil into your paella pan or closest approximation and sprinkle in salt.
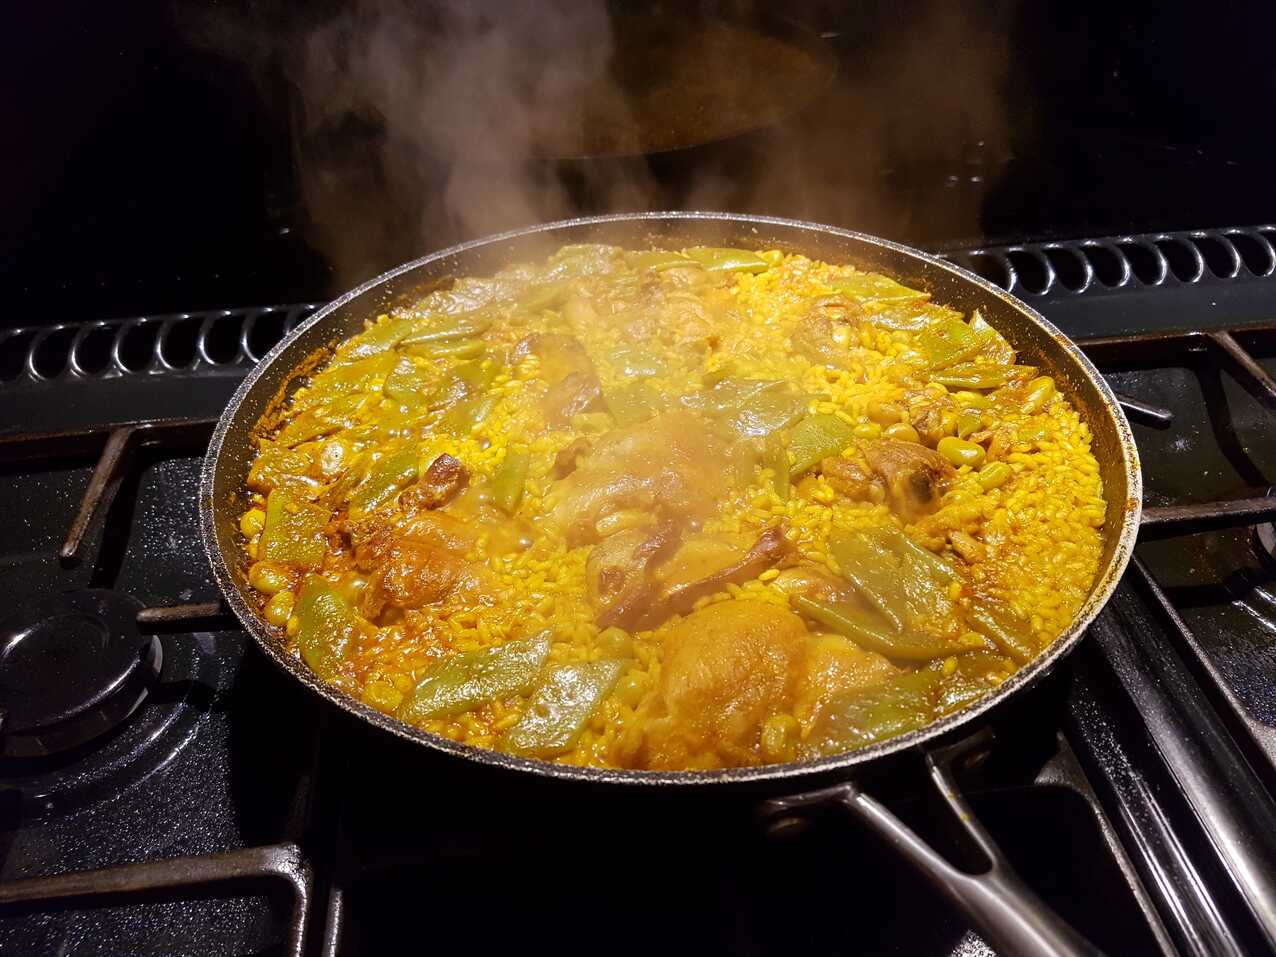
Continue to cook over high heat for 5-10 minutes until the rice begins to appear through the stock. Lower the heat slightly until the surface of the paella dries off, then lay on any decorative vegetables you might have prepared, decorate with several fresh rosemary sprigs, lower the heat right down and cover the pan with foil. Cook on low for another 5-10 minutes remove the rosemary earlier if the aroma seems overpowering until the rice is al dente.
Let the paella sit for 5 minutes now before serving with slices of lemon on the side. Assuming your Valencian village considers this acceptable. Personally I like it with some lemon garlic aïoli, but I've been banished from my village.
Remove the tough end of the asparagus stalks if using and boil them for a minute, before plunging them into iced water to cool.
Grind the saffron lightly in a pestle and mortar. You can toast it first in a foil wrap in the hot pan for 2-3 minutes if you like, to help release the flavour.
Heat the pan of stock and keep it simmering.
Slice the flat green beans on a bias either lengthways or across, as you like.
Mince the garlic if using.
Grate the tomato on the coarser side of a box grater or similar you can blend them if you prefer.
Joint the rabbit and the chicken. Separate the leg sections and the chicken wings discarding the tips of both.
I used only the legs, wings and thighs, and I left the bones in, though you can remove them if you prefer.
I have no idea what you'd do with the snails - you're on your own there!Pour a small puddle of olive oil into your paella pan or closest approximation and sprinkle in salt.
Allegedly this will help with the browning and prevent spitting. Colour me unconvinced, but heaven forbid I should fight tradition.
Over high heat fry the pieces, turning them only occasionally, until they colour a deep rich golden brown and you're getting a nice build-up of fond in the bottom of the pan.
Don't overcrowd the pan - paella doesn't really use that much meat.
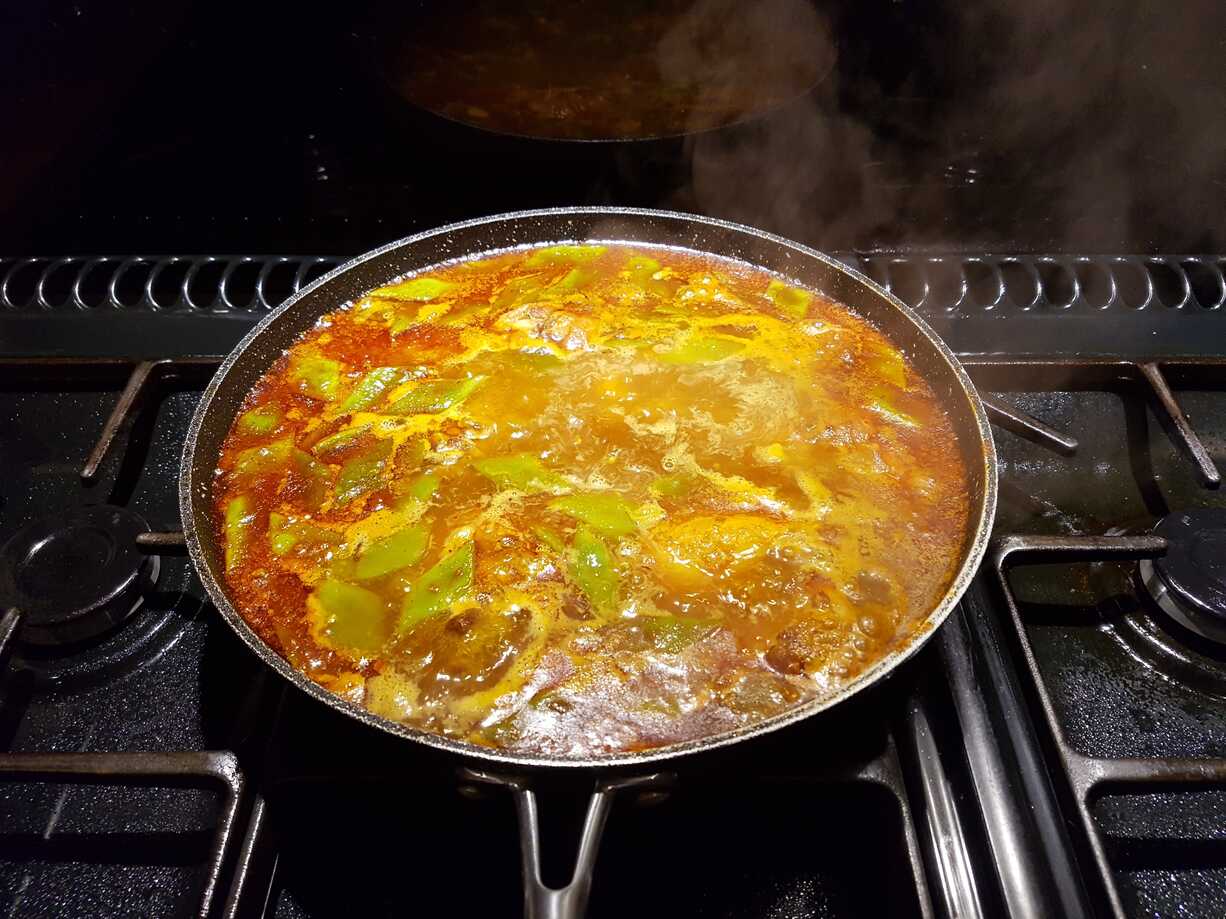
Push the meat to the edges, or remove them to a bowl and add the beans. Continue frying and stirring occasionally.
If you're using tinned or pre-cooked beans save these to add just before the rice.
After a couple of minutes clear a space in the middle and add the garlic if using, and for a minute or two without burning.
Next add the paprika and almost immediately after the crushed or grated tomatoes. Stir-fry until the water is cooked out of the tomatoes and they darken in colour a little,
return any meat you removed, then add the hot stock.
Add about 1 rice quantity extra and cook that off now so you'll end up with three times the volume of rice when you add it.
Bubble for 10-20 minutes or so then add any pre-cooked vegetables I added a can of drained lima beans
and the saffron wash all the saffron from the mortar with some of the stock,
check for seasoning, then distribute the rice and stir.
From now on there will be no more unnecessary stirring to avoid breaking up the rice. We are not making risotto!Continue to cook over high heat for 5-10 minutes until the rice begins to appear through the stock. Lower the heat slightly until the surface of the paella dries off, then lay on any decorative vegetables you might have prepared, decorate with several fresh rosemary sprigs, lower the heat right down and cover the pan with foil. Cook on low for another 5-10 minutes remove the rosemary earlier if the aroma seems overpowering until the rice is al dente.
I made a star arrangement of my par-boiled asparagus stalks, then placed a few strategic tinned white butter beans in between. Asparagus is not traditional.
Covering the paella seems like a good way of making sure the top of paella, especially any decoration you laid on top, cooks properly.
True paella professions probably wouldn't cover theirs, but then they'd be cooking it over a roaring wood fire.
I have seen some of them put the paella in the oven to finish though!
Remove the foil, and the rosemary and turn the heat up for a minute or two just to try and develop a layer of that precious caramelised socarrat on the bottom.
Keep sniffing it and testing with a fork or spoon to make sure you aren't burning it though.Covering the paella seems like a good way of making sure the top of paella, especially any decoration you laid on top, cooks properly.
True paella professions probably wouldn't cover theirs, but then they'd be cooking it over a roaring wood fire.
I have seen some of them put the paella in the oven to finish though!
Let the paella sit for 5 minutes now before serving with slices of lemon on the side. Assuming your Valencian village considers this acceptable. Personally I like it with some lemon garlic aïoli, but I've been banished from my village.
I don't know man, putting aside my lack of an awesome crust, it's well-cooked and all but it's a bit stodgy and frankly dull.
I don't know if that's not just how paellas are? I guess I'll have to go to Spain to find out.
I don't know if that's not just how paellas are? I guess I'll have to go to Spain to find out.
Fried Courgettes with Dill
veg vegan side
You could dress the courgettes with spring onions, lemon juice or grated Parmesan if you don't have any dill.
You could also chop the courgettes into round slices or chunks, but I like the way you can plate the long slices in little pleats.
You could also chop the courgettes into round slices or chunks, but I like the way you can plate the long slices in little pleats.
Ingredients
- butter
- olive oil
- courgettes, sliced lengthways
- garlic, minced
- dill, chopped
Slice the courgettes fairly thinly lengthways.
Fry both sides in a single layer in olive oil and butter until they begin to colour.
Add chopped or minced garlic and sweat until the garlic softens without burning.
Season with salt and pepper and dress with roughly chopped dill fronds.
Though you could use a wide potato peeler for this the slices would be rather thin.
Better to use a knife, or a mandolin.
You can discard the ends, and the first and last crusts which are just skin.
And avoid the seedy centres if you like, which are very watery.Fry both sides in a single layer in olive oil and butter until they begin to colour.
Add chopped or minced garlic and sweat until the garlic softens without burning.
Season with salt and pepper and dress with roughly chopped dill fronds.
They went well with leftover paella.
Flora was impressed!
Flora was impressed!
Ding Ding!
The fish is delicious, but the sauce isn't thick and sticky enough. Not like real teriyaki anyway.
I Probably mixed 2 tblsps salmiakki : 1 tblsp maple syrup - teriyaki gets a lot of its glutinous gloss from the soy sauce, but I don't want to add any of that since the salmiakki is already salty enough. (Or at least, that strange ammonia salt that makes it so distinctive.)
Nor do I want to add more syrup or sugar since I don't want to make it over-sweet.
Perhaps I will need to thicken it with tapioca starch, potato starch (Finns like potatoes) or cornflour, though that feels a little like cheating.
Some Mushroom powder perhaps (Finns like mushrooms)?
Round Two
I tried Equal volumes of salmiakki and syrup. Also, I used about 1 tsp tapioca starch dissolved in 2 tsps water to thicken the sauce. Added off the heat after the sauce has already reduced and foamed.
Nope.
Too sweet and the salmiakki flavour (the whole point of the exercise) is lost.
So now I'm thinking, what about beer, stout or porter?
Or Barley Wine?
What about a splash of red wine vinegar? Finns like vinegar.
Round Three
Jackpot!
Salmiakki:Barley-Wine:Maple-Syrup in ratios 3:2:1 gives a pretty good reduction with a nice barley edge to it. You can thicken it slightly with tiny pinches of xanthan gum if you like.
And you may just have to!