Eldorado Senior's Birthday Dinner 2009
Working up a nice dinner for Rachel's Dad and his partner Joyce.
This is a tricky exercise,
Dad can't handle too much food at one go as he's not in the best of health,
so we are going for a series of appetizers followed by the
Indoor Barbecue Mixed Kebabs
as a main course,
which Rachel thought her Dad would quite like.
Joyce has refined taste and impressive culinary qualifications herself, though,
so we're looking for at least one course that's pretty damn awesome.
I'm hoping the Bombers will serve.
I'm hoping the Bombers will serve.
Smoked Salmon With Horseradish Mousse
starter fish
Makes 35-40Ingredients
500g thinly sliced smoked salmon
horseradish mousse
150ml double cream, chilled
2 Tbsp freshly grated horseradish, or 3 Tbsps ready-made hot horseradish sauce.
squeeze of lemon juice
salt and pepper
pumpernickel or rye bread
lemon wedges (optional)
Method
horseradish mousse
150ml double cream, chilled
2 Tbsp freshly grated horseradish, or 3 Tbsps ready-made hot horseradish sauce.
squeeze of lemon juice
salt and pepper
pumpernickel or rye bread
lemon wedges (optional)
Horseradish Mousse
Put a mixing bowl in the freezer to chill thoroughly.
Whisk the cream in the chilled bowl until it just starts to thicken, then add the horseradish and a squeeze of lemon juice. Whisk a little more until thick, but not stiff. Add a pinch of salt and several twists of pepper, then set aside to infuse for 15 minutes.
Finish by whipping the cream until it is just stiff.
Smoked Salmon Rolls
Cut the smoked salmon into rectangles, 8-10cm wide and 15-20cm long.
Tear off a sheet of cling film, slightly longer than the salmon rectangles. Lay a smoked salmon rectangle on the cling film with a long side towards you, leaving at least 3cm cling film free at the front. Pipe a line of horseradish mousse along the salmon, 2cm from the edge closest to you. Lift the cling film overhang and roll the salmon around the horseradish mousse to enclose it and form a roll. Twist the ends of the cling film tightly and tie to form a sausage shape, then place in the freezer.
Repeat with the rest of the salmon and horseradish mousse.
To Serve
Unwrap the frozen salmon rolls and cut into 1cm slices. Allow to defrost at room temperature for about 30 minutes.
Serve on squares of pumpernickel or rye bread, with lemon wedges if you like.
Put a mixing bowl in the freezer to chill thoroughly.
Whisk the cream in the chilled bowl until it just starts to thicken, then add the horseradish and a squeeze of lemon juice. Whisk a little more until thick, but not stiff. Add a pinch of salt and several twists of pepper, then set aside to infuse for 15 minutes.
Finish by whipping the cream until it is just stiff.
Carefully - the cream will thicken very quickly.
Put into a piping bag fitted with a 1cm plain nozzle and refrigerate for about 20 minutes until well chilled.
A resealable food bag with the corner cut off works quite well
Smoked Salmon Rolls
Cut the smoked salmon into rectangles, 8-10cm wide and 15-20cm long.
Tear off a sheet of cling film, slightly longer than the salmon rectangles. Lay a smoked salmon rectangle on the cling film with a long side towards you, leaving at least 3cm cling film free at the front. Pipe a line of horseradish mousse along the salmon, 2cm from the edge closest to you. Lift the cling film overhang and roll the salmon around the horseradish mousse to enclose it and form a roll. Twist the ends of the cling film tightly and tie to form a sausage shape, then place in the freezer.
Repeat with the rest of the salmon and horseradish mousse.
To Serve
Unwrap the frozen salmon rolls and cut into 1cm slices. Allow to defrost at room temperature for about 30 minutes.
Serve on squares of pumpernickel or rye bread, with lemon wedges if you like.
Quite nice, and easy to prepare well ahead.
I made this as a 2016 Christmas starter - but I infused the (un-whipped) cream with horseradish overnight,
then strained and whipped it in one process, without an intervening 15 minute infusion.
I also added a splash of vodka with the lemon juice, if it makes any difference :)
Chilled Pumpkin & Ginger Soup
soup
Serves 6Ingredients
100g unsalted butter
900g peeled, deseeded pumpkin, roughly chopped takes about twice the weight of raw pumpkin
generous 20g piece fresh root ginger, peeled and roughly sliced
70g sugar
salt & pepper
50ml dry white wine I used a rather-less-than-dry Chardonnay, which might explain some of the extreme sweetness, but it was tasty!
1 litre light chicken stock 75ml double cream
crystallised ginger
40g piece fresh root ginger, peeled
2 Tbsps icing sugar, plus a little extra to dust
oil, to deep-fry
Method
900g peeled, deseeded pumpkin, roughly chopped takes about twice the weight of raw pumpkin
generous 20g piece fresh root ginger, peeled and roughly sliced
70g sugar
salt & pepper
50ml dry white wine I used a rather-less-than-dry Chardonnay, which might explain some of the extreme sweetness, but it was tasty!
1 litre light chicken stock 75ml double cream
crystallised ginger
40g piece fresh root ginger, peeled
2 Tbsps icing sugar, plus a little extra to dust
oil, to deep-fry
pumpkin and ginger soup
Melt the butter in a heavy-based saucepan. Add the chopped pumpkin, ginger, sugar and 1 tsp salt. Stir, then cover with a tight-fitting lid and sweat over a low heat for about 45 minutes, stirring occasionally. Remove the lid and continue cooking to reduce the liquid until the pumpkin is almost dry.
Add the white wine and reduce by two-thirds. Add the chicken stock.
You can cool and hold the soup at this stage for a day or so if you like. Skim off the fat and reheat gently to continue the recipe.
Add the cream and cook gently for 10 minutes. Cool slightly, then whizz in a blender until smooth. Pass through a fine sieve into a bowl. Reheat to serve hot or leave to cool, cover and chill.
crystallized ginger
Cut the ginger into julienne (or fine matchstick strips) and place in a bowl. Add the icing sugar, toss to coat and allow to stand for 45 minutes, turning from time to time.
Tip the ginger into a strainer, rinse under cold running water to remove the sugar and dry thoroughly on kitchen paper.
Heat 4-5cm depth of oil in a small, deep, heavy pan to 150°C. Add the ginger julienne and deep-fry for 10 seconds, then remove immediately and drain on kitchen paper.
Dust lightly with icing sugar.
to serve
Check the seasoning, then ladle the soup hot, or into chilled bowls, and garnish with the crystallized ginger.
Gorgeous piping hot, or chilled.
Quite sweet and pudding-like though, and not a million miles from my pumpkin crème brûlée (perhaps a dryer wine would have helped?) so match with other dishes carefully.
The crystallised ginger is lovely - crisp, sweet and still sharply flavoured.
Quite sweet and pudding-like though, and not a million miles from my pumpkin crème brûlée (perhaps a dryer wine would have helped?) so match with other dishes carefully.
The crystallised ginger is lovely - crisp, sweet and still sharply flavoured.
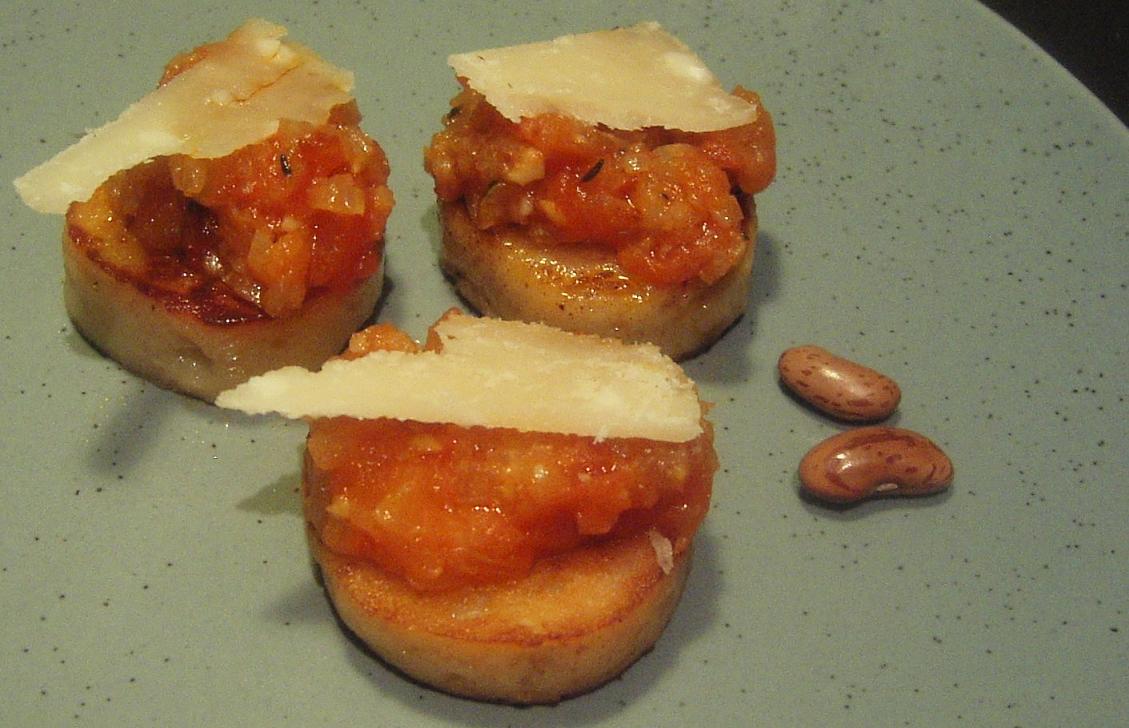
Pan-Fried Gnocchi With Tomato Fondue & Parmesan
starter cheese
Ingredients
gnocchi
3 large baking potatoes, such as Desirée or King Edward, about 800g in total
125g plain flour, sifted
125g Parmesan cheese, freshly grated
1 whole egg, plus 2 egg yolks
3 Tbsp finely chopped chives
salt
tomato fondue
5 large plum tomatoes
1 small bunch of thyme sprigs
1 small bunch of rosemary sprigs
4 Tbsps olive oil
½ onion, peeled and finely diced
2 garlic cloves, peeled and cracked or pressed
salt & pepper
to assemble
30g plain flour, to dust
60g unsalted butter
50g Parmesan cheese, shaved
Method
3 large baking potatoes, such as Desirée or King Edward, about 800g in total
125g plain flour, sifted
125g Parmesan cheese, freshly grated
1 whole egg, plus 2 egg yolks
3 Tbsp finely chopped chives
salt
tomato fondue
5 large plum tomatoes
1 small bunch of thyme sprigs
1 small bunch of rosemary sprigs
4 Tbsps olive oil
½ onion, peeled and finely diced
2 garlic cloves, peeled and cracked or pressed
salt & pepper
to assemble
30g plain flour, to dust
60g unsalted butter
50g Parmesan cheese, shaved
gnocchi
Preheat the oven to 200°C (190°C fan oven) (Gas 6). Prick the potato skins, then put the potatoes on a baking tray and bake for about 1½ hour until tender. Leave to cool, then halve and scoop out the flesh. Pass this through a potato ricer or a medium sieve into a bowl. Add the flour, Parmesan, egg, egg yolks and chives. Mix thoroughly, using an electric mixer controversial - you can do this by hand anyway, and season with salt to taste.
tomato fondue
Make a small cross incision on the base of each tomato, immerse in boiling water for 5 seconds, then remove and refresh in iced water. Peel away the skins and roughly chop the tomatoes. Tie the herb sprigs together in muslin or with string. Put a medium saucepan over a low heat and pour in the olive oil. Add the onion, garlic, herbs and a pinch of salt. Cover and sweat for about 10 minutes until the onion is soft, then add the chopped tomatoes. Gently simmer for 20 minutes, stirring occasionally, until the tomato fondue is well reduced, thick and pulpy. Check the seasoning remove the garlic and set aside.
to assemble Unwrap the cooked gnocchi, cut into 2-3cm lengths and dust with flour. Heat a non-stick frying pan over a medium heat. Add the butter and heat until melted and light brown, then add the gnocchi and cook, turning occasionally, for 3-5 minutes until golden brown. In the meantime, warm the tomato fondue in the microwave, or a small pan over low heat. Drain the gnocchi on kitchen paper and arrange on a serving tray, and top each one with a little tomato fondue and sliver of shaved Parmesan. Serve warm, as an elegant canapé.
Preheat the oven to 200°C (190°C fan oven) (Gas 6). Prick the potato skins, then put the potatoes on a baking tray and bake for about 1½ hour until tender. Leave to cool, then halve and scoop out the flesh. Pass this through a potato ricer or a medium sieve into a bowl. Add the flour, Parmesan, egg, egg yolks and chives. Mix thoroughly, using an electric mixer controversial - you can do this by hand anyway, and season with salt to taste.
The dough can be tacky, but not too sticky. You should be able to handle the dough fairly easily.
Lay a large sheet of all-purpose cling film on a work surface.
Spoon a 15-20cm length of gnocchi mixture along the front edge, leaving a good length of cling film free at both ends.
Roll the mixutre tightly in the cling film, then twist and tie the ends to secure.
It helps if these rolls are really well sealed, and quite tightly rolled.
Make the rolls a bit wider than a 2£ coin.
Repeat with the rest of the mixture.
Bring a large pan of water to the boil and cook the gnocchi rolls in the boiling water for 10 minutes.
The gnocchi are cooked when they float to the surface
Remove with a slotted spoon and refresh in iced water.tomato fondue
Make a small cross incision on the base of each tomato, immerse in boiling water for 5 seconds, then remove and refresh in iced water. Peel away the skins and roughly chop the tomatoes. Tie the herb sprigs together in muslin or with string. Put a medium saucepan over a low heat and pour in the olive oil. Add the onion, garlic, herbs and a pinch of salt. Cover and sweat for about 10 minutes until the onion is soft, then add the chopped tomatoes. Gently simmer for 20 minutes, stirring occasionally, until the tomato fondue is well reduced, thick and pulpy. Check the seasoning remove the garlic and set aside.
The second time I made the 'fondue' I deseeded the tomatoes and cracked the garlic to remove it later.
I'm not sure it wasn't better the first time when I pressed the garlic and left in the seeds.
to assemble Unwrap the cooked gnocchi, cut into 2-3cm lengths and dust with flour. Heat a non-stick frying pan over a medium heat. Add the butter and heat until melted and light brown, then add the gnocchi and cook, turning occasionally, for 3-5 minutes until golden brown. In the meantime, warm the tomato fondue in the microwave, or a small pan over low heat. Drain the gnocchi on kitchen paper and arrange on a serving tray, and top each one with a little tomato fondue and sliver of shaved Parmesan. Serve warm, as an elegant canapé.
These are a reasonably tasty little snack, nothing particular spectacular though.
The gnocchi rolls can be made ahead and kept wrapped in cling film in the fridge for up to 3 days; they can also be frozen.
The gnocchi rolls can be made ahead and kept wrapped in cling film in the fridge for up to 3 days; they can also be frozen.
Olive & Sun-Dried Tomato Bread
bread veg
Makes 2 LoavesIngredients
400g/14 oz plain flour, plus extra for dusting
1 tsp salt
1 sachet easy-blend dried yeast
1 tsp brown sugar
1 Tbsp chopped fresh thyme
200ml/7 fl oz lukewarm water
4 Tbsps olive oil, plus extra for dusting
55g/2 oz black olives, stoned and sliced I used greek-style dry, salted black olives and halved them
55g/2 oz green olives, stoned and sliced
100g/3½ oz sun-dried tomatoes in oil, drained and sliced
1 egg yolk, beaten
Method
1 tsp salt
1 sachet easy-blend dried yeast
1 tsp brown sugar
1 Tbsp chopped fresh thyme
200ml/7 fl oz lukewarm water
4 Tbsps olive oil, plus extra for dusting
55g/2 oz black olives, stoned and sliced I used greek-style dry, salted black olives and halved them
55g/2 oz green olives, stoned and sliced
100g/3½ oz sun-dried tomatoes in oil, drained and sliced
1 egg yolk, beaten
Sift the flour and salt together into a bowl and stir in the yeast, sugar and thyme.
Make a well in the centre and pour in the lukewarm water and olive oil.
Stir well with a wooden spoon until the dough begins to come together,
then knead with your hands until it leaves the side of the bowl.
Turn out on to a lightly floured surface and knead in the olives and sun-dried tomatoes,
then knead for a further 5 minutes, until the dough is smooth and elastic.
This might take a while and quite a lot of extra flour if the olives and tomatoes are oily
Brush a bowl with oil. Shape the dough into a ball, put it in the bowl and put the bowl into a plastic bag or cover with a damp tea towel. The plastic bag thing works pretty well Leave to rise in a warm place for 1-1½ hours, until the dough has doubled in volume.
Dust a baking sheet with flour. Turn out the dough on to a lightly floured surface and knock back with your fist. Cut it in half and with lightly floured hands, shape each half into a round or oval. Put them on the prepared baking sheet and put the baking sheet into a plastic bag or cover with a damp tea towel. Leave to rise in a warm place for 45 minutes.
Preheat the oven to 200°C/400°F/Gas Mark 6. Mark 3 shallow diagonal slashes on top of each loaf and brush with the beaten egg yolk. Bake for 40 minutes, until golden brown and the loaves sound hollow when tapped on the base with your knuckles. Transfer to a wire rack to cool.
Really tasty. The timings were about right.
Not sure it really goes with Pumpkin and Ginger Soup though.
Not sure it really goes with Pumpkin and Ginger Soup though.
I did try making this in a bread machine, but it didn't really work out too well.
Very heavy and soggy. Maybe because it had to be done as one loaf rather than two.
Leek & Red Onion Tartlets
starter meat
Makes 10-12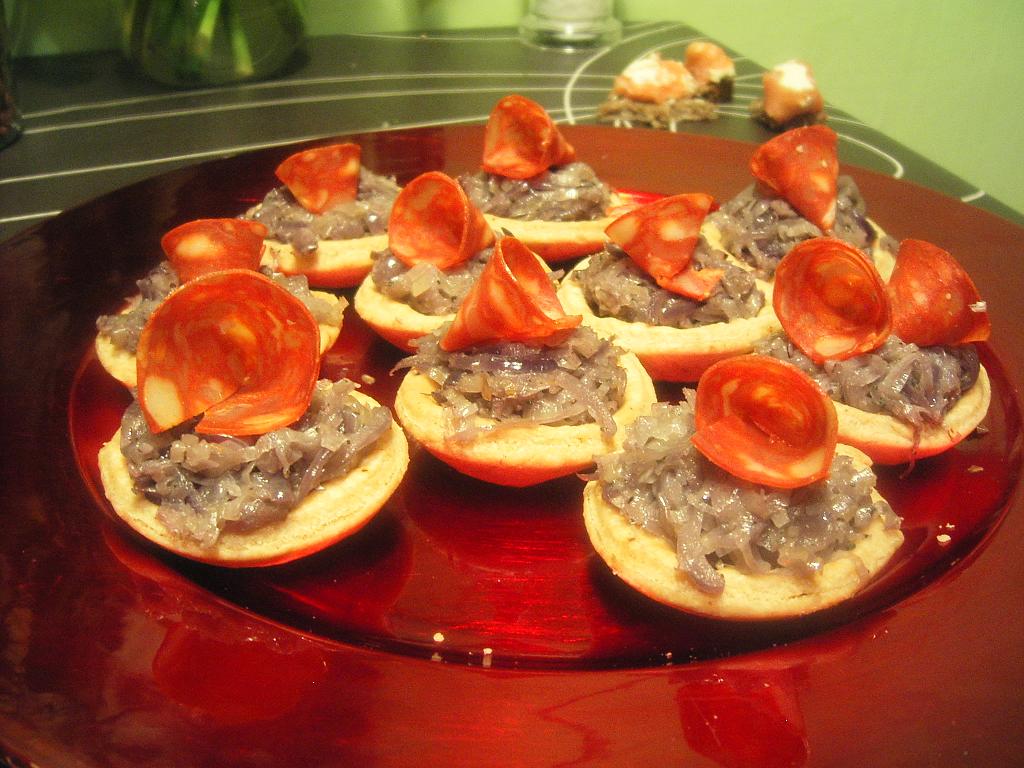
pastry cases
200g shortcrust pastry
flour, to dust
filling
30g unsalted butter
2 red onions, peeled and thinly sliced
1 large leek, split lengthways, cleaned and thinly sliced
1 garlic clove, peeled and smashed
1 tsp chopped sage
salt and pepper
to finish
12 thin slices of chorizo sausage
Method
200g shortcrust pastry
flour, to dust
filling
30g unsalted butter
2 red onions, peeled and thinly sliced
1 large leek, split lengthways, cleaned and thinly sliced
1 garlic clove, peeled and smashed
1 tsp chopped sage
salt and pepper
to finish
12 thin slices of chorizo sausage
tartlet cases
Preheat the oven to 200°C (190°C fan oven) Gas 6. Dust the surface lightly with flour and roll out the pastry to a 3-4mm thickness. Gordon Ramsay suggest the thickness of a 1£ coin. He also warns against over-working the pastry and keeping everything chilled.
Cover with cling film and rest for 30 minutes. Cut out discs and use to line a tray of tartlet moulds, 6-8cm in diameter. Prick the bases with a fork, line with greaseproof paper and baking beans, cover with cling film and rest in the fridge for 30 minutes. Remove the cling film and bake the tartlet cases blind for 15-20 minutes until golden brown and crisp. Transfer to a wire rack to cool slightly.
leek and red onion filling
Melt the butter in a medium pan over a low heat. Add the red onions, leek, garlic and sage, and season generously with salt and pepper. Stir, then cover and sweat for 10-15 minutes until tender. Drain on kitchen paper.
to serve
Spoon the warm leek and onion mixture into the tartlet cases. Roll each chorizo slice into a cornet and place on top. either slit a chorizo circlet to the centre, or use half-circles to roll up
Serve warm.
These didn't quite work - the stringy leek and onion mixture made the tartlets difficult to eat
and the pastry was a bit heavy (not that pastry is exactly my forté).
Maybe the leek & onion could be chopped finer.
A layer of some kind of cream cheese on the pastry might be nice.
The chorizo went well however.
They were slightly improved by reheating, filled and decorated, back in the oven for a few minutes.
Maybe the leek & onion could be chopped finer.
A layer of some kind of cream cheese on the pastry might be nice.
The chorizo went well however.
They were slightly improved by reheating, filled and decorated, back in the oven for a few minutes.
A cookingwithkarl Original!
Tomato Bombers/Shockers
starter veg


 Ingredients
Sherbet
vine tomatoes, peeled, seeded, quartered
ascorbic or citric acid powder
sodium bicarbonate
icing sugar
Bombs
cherry tomatoes, peeled, deseeded
Roquefort, mashed
thinly sliced lemon peel (optional)
Method
vine tomatoes, peeled, seeded, quartered
ascorbic or citric acid powder
sodium bicarbonate
icing sugar
Bombs
cherry tomatoes, peeled, deseeded
Roquefort, mashed
thinly sliced lemon peel (optional)
 Make The Sherbet
Peel and deseed the lovely, fat, juicy, burgundy vine tomatoes and cut into quarters.
Place on parchment on a baking sheet in the lowest possible oven and leave overnight or for 24 hours until they are completely dried out.
You can keep these for a while at this stage without them moistening up.
A week anyway - you can always dry them back out again if they start to soften.
If your oven doesn't run cool enough though, leaving them in overnight can result in something more resembling charcoal briquettes...
If your oven doesn't run cool enough though, leaving them in overnight can result in something more resembling charcoal briquettes...
Grind the dried tomato to powder in a mortar.
Mix around one teaspoon of ascorbic or citric acid and half a teaspoon of bicarb with two teaspoons of ground tomato powder. You can add a little icing sugar if this is too sour.
The quantities definitely need a little experimentation.
I finally found some citric acid powder in a home brew shop to try instead of the ascorbic acid.
It's a bit more sour than the ascorbic, but doesn't have quite the bitter after-taste.
You shouldn't mix this up too early - it loses its fizz quite quickly, especially if you add sugar.
You shouldn't mix this up too early - it loses its fizz quite quickly, especially if you add sugar.
Cook The Bombs
Peel and hollow out the cherry tomatoes, fill with mashed-up Roquefort. Sit the tomatoes up in a grill-proof dish, and grill until the Roquefort begins to melt and crisp up on top.
You can scatter with lemon peel either before or after grilling if you like
Serve
Serve each tomato bomb on an individual dessert spoon. A white one if you could get some.
Dust a layer of sherbet at the end of the spoon, and place the cherry tomato in the bowl. Eat in one motion, allowing the sherbet to fizz on the tongue briefly before the cherry tomato bomb arrives.
Fantastic!
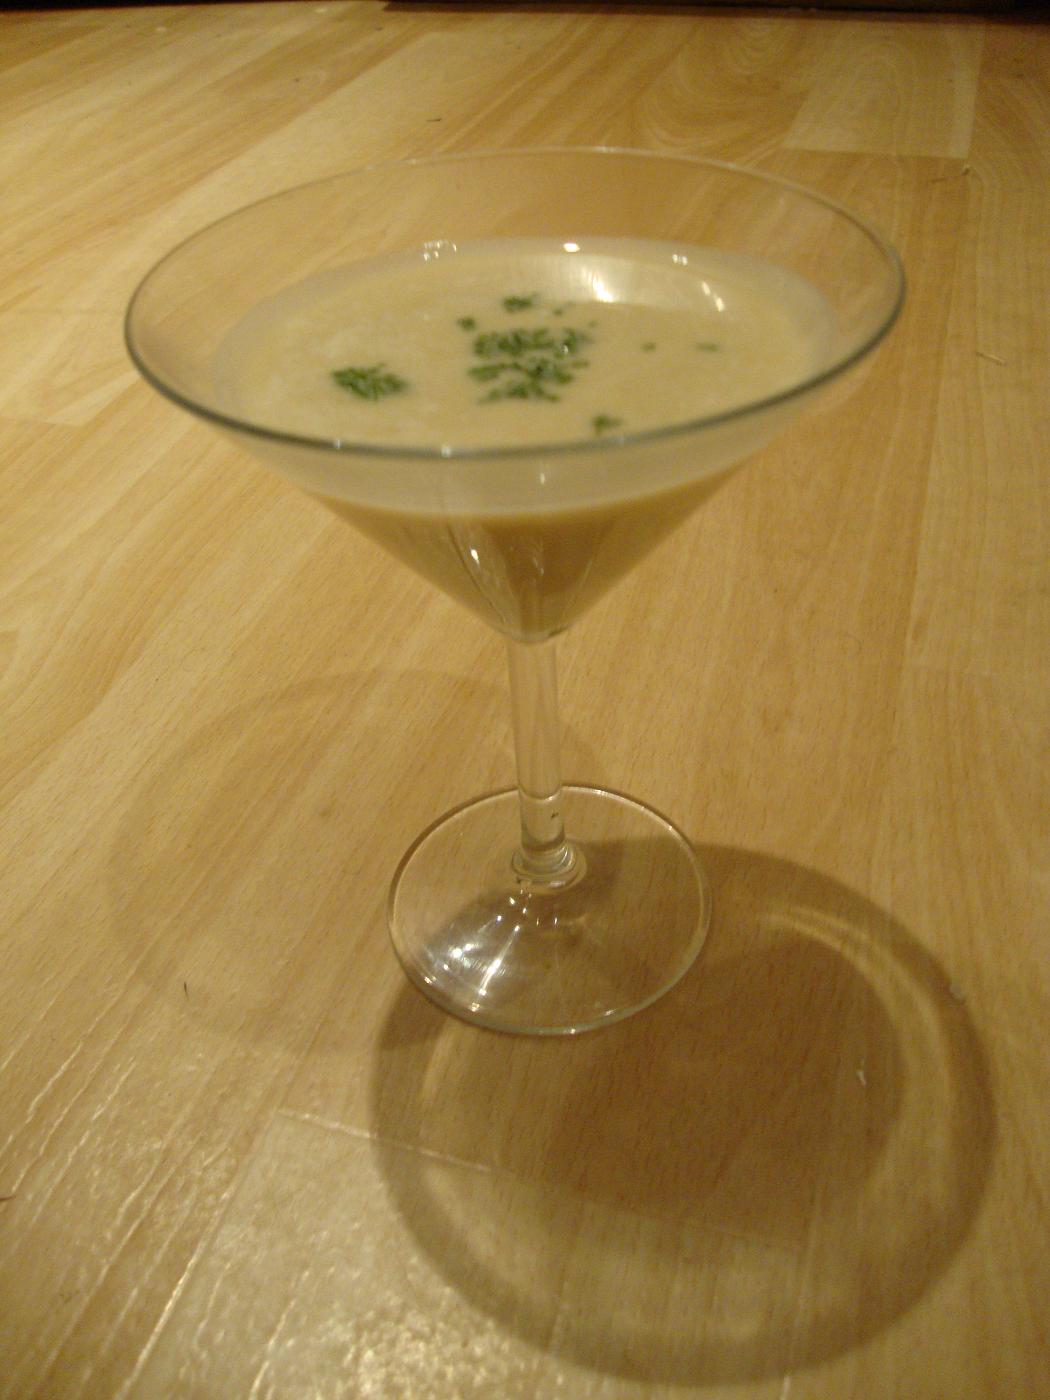
Cannellini Beans and White Truffle Oil Soup
soup
I know, I know. Truffle oil is shit and doesn't really contain any truffle.
The soup still tastes delicious.
Go ahead and infuse your own oil if it makes you feel better.
The soup still tastes delicious.
Go ahead and infuse your own oil if it makes you feel better.
Ingredients
100g haricot or cannellini beans, soaked in cold water overnight
1 whole garlic bulb
1 onion, peeled and quartered
1 carrot, peeled and quartered
1 sprig each of rosemary, thyme and parsley
200g piece smoked bacon
2 litres light chicken stock
100g unsalted butter
4 shallots, peeled and finely chopped
1 lemon thyme sprig
150ml double cream
1 Tbsp truffle oil, plus extra to drizzle
finely sliced chives
Method1 whole garlic bulb
1 onion, peeled and quartered
1 carrot, peeled and quartered
1 sprig each of rosemary, thyme and parsley
200g piece smoked bacon
2 litres light chicken stock
100g unsalted butter
4 shallots, peeled and finely chopped
1 lemon thyme sprig
150ml double cream
1 Tbsp truffle oil, plus extra to drizzle
finely sliced chives
Cook the Beans
Drain the pre-soaked beans, put them into a large saucepan and cover with fresh cold water. Bring to the boil, then drain and return the beans to the pan. Cut the garlic bulb in half crossways (through the cloves) and add one half to the pan with the onion, carrot, rosemary, thyme and parsley. Roughly chop half of the bacon and add to the pan. Pour in the stock, bring to a simmer and cook until the beans are tender, about 1½-2 hours. Drain the beans, reserving the cooking liquor. Discard the herb sprigs, vegetables and garlic.
The Soup Base
Peel and finely chop the other half of the garlic. Dice the remaining garlic. Melt 80g of the butter in a large pan, then add the chopped garlic, diced bacon, shallots and lemon thyme. Stir, then cover and sweat over a low heat for about 15 minutes until the shallots are soft but not coloured.
The Puréed Soup
Now add the reserved bean cooking liquor to the soup base, together with half of the beans or all of them for serving as a canapé and the cream. Simmer gently for 15 minutes, then remove from the heat. Cool slightly, then tip into a blender and whiz until smooth. Pass through a fine sieve into a clean pan or bowl. Adjust the seasoning, then stir in the truffle oil. (The soup can be prepared ahead to this stage and kept in the fridge for up to 2 days; refrigerate the whole beans separately).
To Serve
Whiz the soup, using a hand-held blender to froth just before pouring into small serving cups. Top with a sprinkling of chopped chives.
Drain the pre-soaked beans, put them into a large saucepan and cover with fresh cold water. Bring to the boil, then drain and return the beans to the pan. Cut the garlic bulb in half crossways (through the cloves) and add one half to the pan with the onion, carrot, rosemary, thyme and parsley. Roughly chop half of the bacon and add to the pan. Pour in the stock, bring to a simmer and cook until the beans are tender, about 1½-2 hours. Drain the beans, reserving the cooking liquor. Discard the herb sprigs, vegetables and garlic.
Separating the beans is a fiddly job - it might be easier if they (or the vegetables)
could be bagged somehow during the cooking.
The Soup Base
Peel and finely chop the other half of the garlic. Dice the remaining garlic. Melt 80g of the butter in a large pan, then add the chopped garlic, diced bacon, shallots and lemon thyme. Stir, then cover and sweat over a low heat for about 15 minutes until the shallots are soft but not coloured.
The Puréed Soup
Now add the reserved bean cooking liquor to the soup base, together with half of the beans or all of them for serving as a canapé and the cream. Simmer gently for 15 minutes, then remove from the heat. Cool slightly, then tip into a blender and whiz until smooth. Pass through a fine sieve into a clean pan or bowl. Adjust the seasoning, then stir in the truffle oil. (The soup can be prepared ahead to this stage and kept in the fridge for up to 2 days; refrigerate the whole beans separately).
To Serve
Whiz the soup, using a hand-held blender to froth just before pouring into small serving cups. Top with a sprinkling of chopped chives.
An absolutely lovely soup, which looked quite beautiful served in cocktail glasses.
This is especially rich since it's basically made from a double stock - a normal light chicken stock is used as the basis of a smoked bacon stock which is then used as the basis of the bean soup.
If serving in a bowl you can reserve about half the whole beans to heat gently in the remaining 20g of butter then spoon into the bottom of the bowl and cover with the hot puréed soup. Finish with droplets of truffle oil rather than the chives in this case.
I was embarrassed to admit that I hadn't juiced my own white truffles to create the oil, but had bought the bottle in a deli.
Next time I'm renting me a truffle pig!
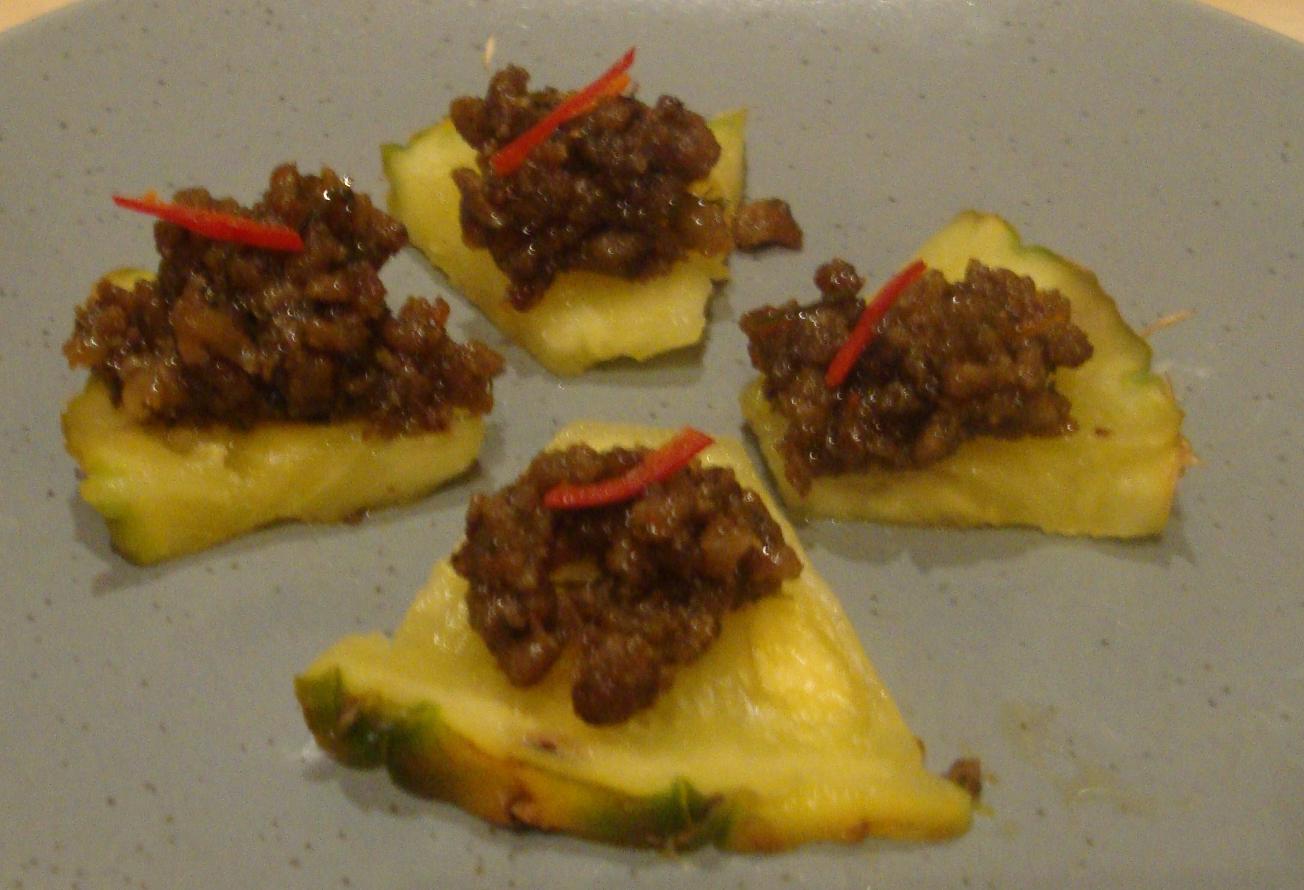
Ma Hor on Pineapple
starter meat fish
Ingredients
2 garlic cloves, roughly chopped
2 Tablespoons roughly chopped coriander root
½ teaspoon green peppercorns (pickled)
1 teaspoon grated ginger
2 spring onions, chopped
2 Tablespoons peanut oil
5½ oz (150g) minced (ground) pork
2½ oz (75g) minced prawn meat around 3-4 fresh tiger prawns
½ teaspoon finely chopped kaffir lime (makrut) leaves
1½ Tablespoons palm sugar (jaggery)
1½ Tablespoons fish sauce
1 pineapple, quartered, core removed
2 red chillies, seeded and finely sliced to garnish
Method
2 Tablespoons roughly chopped coriander root
½ teaspoon green peppercorns (pickled)
1 teaspoon grated ginger
2 spring onions, chopped
2 Tablespoons peanut oil
5½ oz (150g) minced (ground) pork
2½ oz (75g) minced prawn meat around 3-4 fresh tiger prawns
½ teaspoon finely chopped kaffir lime (makrut) leaves
1½ Tablespoons palm sugar (jaggery)
1½ Tablespoons fish sauce
1 pineapple, quartered, core removed
2 red chillies, seeded and finely sliced to garnish
Shell then finely chopped your fresh prawns.
Place the garlic, coriander, peppercorns, ginger, spring onions and oil in a food processor and pulse until a smooth paste is formed. Heat a frying pan over medium heat, add the paste and cook for 2 minutes. Add the pork and prawn meat, stirring occasionally, until the meat has coloured. Add the kaffir lime leaves, palm sugar and fish sauce, reduce the heat and cook until slightly sticky.
Slice the quartered pineapple in ½" (1cm) thick triangles, top with the cooled mixture and garnish with chilli.
Place the garlic, coriander, peppercorns, ginger, spring onions and oil in a food processor and pulse until a smooth paste is formed. Heat a frying pan over medium heat, add the paste and cook for 2 minutes. Add the pork and prawn meat, stirring occasionally, until the meat has coloured. Add the kaffir lime leaves, palm sugar and fish sauce, reduce the heat and cook until slightly sticky.
you can moisten with any leftover coconut water you may have at this point.
you can also cook to this point and keep until ready to reheat.
Allow to cool slightly.you can also cook to this point and keep until ready to reheat.
Slice the quartered pineapple in ½" (1cm) thick triangles, top with the cooled mixture and garnish with chilli.
Quite delicious combination of eastern flavours in this Thai dish
which apparently translates as "Galloping Horses".
The meat mixture can be served warm, but not too hot. I suppose you could make it spicier for a party of hardier guests.
The meat mixture can be served warm, but not too hot. I suppose you could make it spicier for a party of hardier guests.
White Chocolate Crème Brûlée
dessert veg
Makes 4 ServingsIngredients
4 oz White Chocolate Baking Bar
4 large egg yolks, at room temperature
⅓ cup plus 4 teaspoons granulated white sugar
2 cups heavy cream
½ real vanilla pod, split
Method
4 large egg yolks, at room temperature
⅓ cup plus 4 teaspoons granulated white sugar
2 cups heavy cream
½ real vanilla pod, split
Preheat oven to 150°C (300°F).
In medium bowl, whisk egg yolks with sugar until smooth. In 2-quart saucepan, bring whipping cream to a simmer over medium-high heat with the vanilla pod. Remove the pod once the cream is infused. Add the white chocolate (chopped in small pieces) to simmering whipping cream. Turn off heat and whisk until white chocolate is melted. Add 2 tablespoons of the white chocolate mixture to the egg yolk mixture, whisking continually to prevent the eggs from scrambling. Add the remaining white chocolate whisking continuously. Whisk until smooth.
Pour into four 6" ramekins or custard cups. Place the cups in a 9"x13" baking pan. Add enough hot water so the cups sit in 1 to 1½ inches of water.
Bake for about 45 minutes until set.
And make sure they are set. They still wobble slightly in the centre when shaken, but the edges seem firm, and they're getting a little springy to the touch.
Serve warm, at room temperature, or refrigerate overnight.
Personally I prefer them a little chilled, to contrast the scalding hot sugar topping, but not really cold when they start to develop a rather greasy texture.
For a delicious crunchy surface: Sprinkle the tops of the crème brûlée with 1 teaspoon of sugar and place under broiler until caramelized, 3 to 4 minutes.
Yum!
Rich.
But yum!
Rich.
But yum!